BrailleBlaster User Guide
BrailleBlaster User Guide
January 6, 2021
- Table of contents
- BrailleBlaster User Guide
- Getting Started
- Automated Features and Tools
- Other Editing Tools and Features
- Glossary
- Help
- Appendix A: Formatting Styles
- Appendix B: Shortcut Key Combinations
Getting Started
Please watch our videos: Introduction to BrailleBlaster and Getting Started with BrailleBlaster!
Modifying the View
BrailleBlaster’s customizable interface allows you to adjust the size and placement of tools to suit your preferences.
Changing Font Size
Font Size can be increased or decreased to your preferred text size. Be aware that increasing or decreasing the font size may change how much text is shown on the screen in the Print and Braille Views.
To change Font Size either go to View > Increase Font Size or Decrease Font Size. You can also use the shortcuts (Ctrl + “+”) to Increase Font Size OR (Ctrl + “-”) to Decrease Font Size.
Modifying Toolbar Icons
The button icons on the toolbar can be displayed or hidden from view. The size of the icons can also be changed by going to View > Icon Size. This gives you the option of having Small, Medium, or Large icons. How much text is shown in the Print and Braille Views of your document is also dependent on Icon Size.
To change how the toolbar buttons are displayed:- Go to View > Toolbar. The buttons that are currently shown on the toolbar have checkmarks beside them.
- Check or uncheck which grouping of buttons you would like to have shown or hidden in the toolbar.
Note: The default for the toolbar buttons is all groupings are shown in the toolbar, except for the View and Math tools.
Toggle Views
You can choose to hide or display text views on your screen allowing you to focus on one view or multiple views.
- Go to View > Toggle Views. This shows which views you have open in the main window with check marks beside the following views:
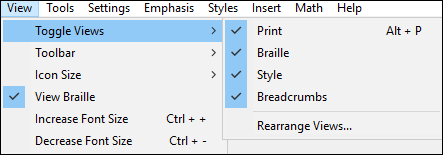
 Print (Alt + P): Shows the Print text
Note: You can only make changes to the text from within the Print View. Braille: Shows the Braille text
 Style: Shows which style is applied to the text.
Breadcrumbs: Shows what styles are applied to sections of the text in the bottom section of the toolbar. Like a trail of breadcrumbs, it shows every style used leading up to that specific piece of text.
- Unchecking an item hides the view from the window.
- Whenever a view is hidden and then displayed it moves to the right-hand side of the screen.
Note: At least one view must always be displayed.
Rearrange Views
BrailleBlaster allows you to arrange the print, braille, and style views in the order that works best for you.
To arrange the views:
- Go to View > Toggle Views > Rearrange Views
- From here, you can select Move Up or Move Down to switch where each view is displayed on the screen.
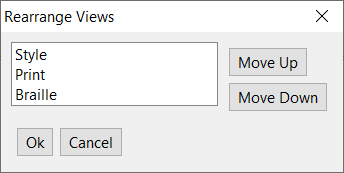
Note: The views display from left to right starting with the first item in the list.
Changing Simulated Braille to ASCII
By checking or unchecking View Braille in the main View menu, you can choose whether you want the text in the Braille View and Braille Preview to appear as simulated braille or ASCII.
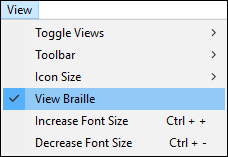
View Braille Checked
View Braille Unchecked
Previewing Your File as an Embossed Braille Document
The Braille Preview displays how the file appears as an embossed BRF. The braille pages are displayed in 2 Page View mode. This side-by-side view is like looking at an open-bound book, with the even numbered braille pages on the left and the odd numbered braille pages on the right. This allows you to ensure the content is presented correctly in interpoint documents, such as when certain things need to be on facing pages or space needs to be allotted for graphics. When viewing Single-sided materials, 2 Page View can be turned off in Braille Preview by going to View > 2 Page View and unchecking it.
To preview a BRF go to File > Braille Preview OR use the keyboard shortcut (Alt + Home). This opens the Braille Preview window.
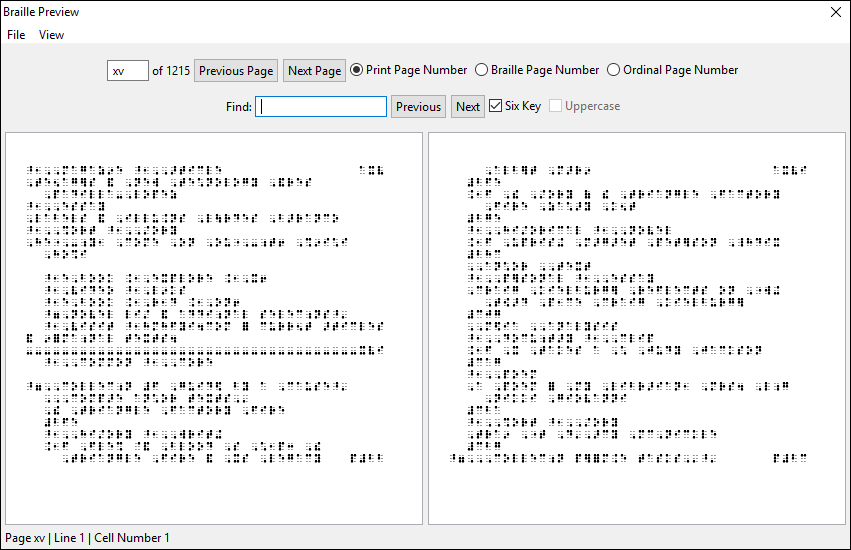
Note: When you open a BRF in BrailleBlaster it appears in this Braille Preview window. You cannot edit the BRF, but it can be embossed by going to File > Emboss within the Braille Preview menu or using the keyboard shortcut (Ctrl + E).
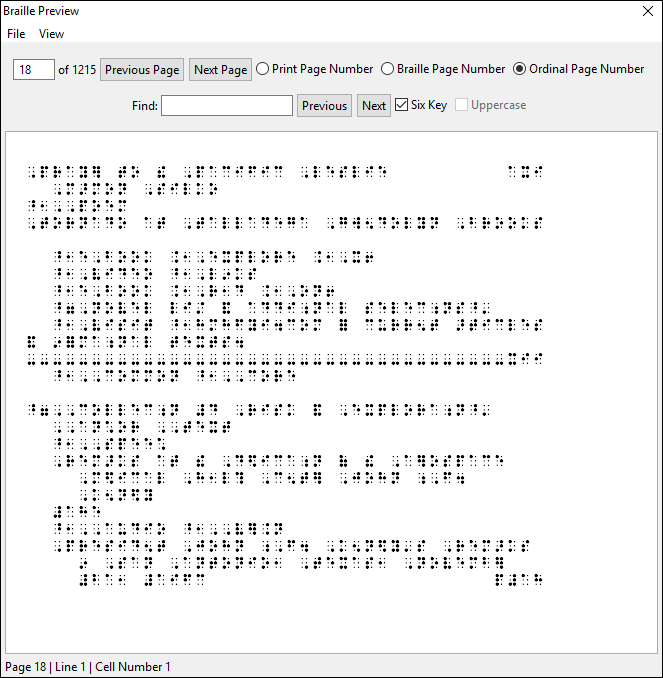
- Print Page Number: The page number normally displayed in the top-right corner of a braille page.

- Braille Page Number: The page number normally displayed in the bottom-right corner of a braille page (including T-Pages and P-Pages).
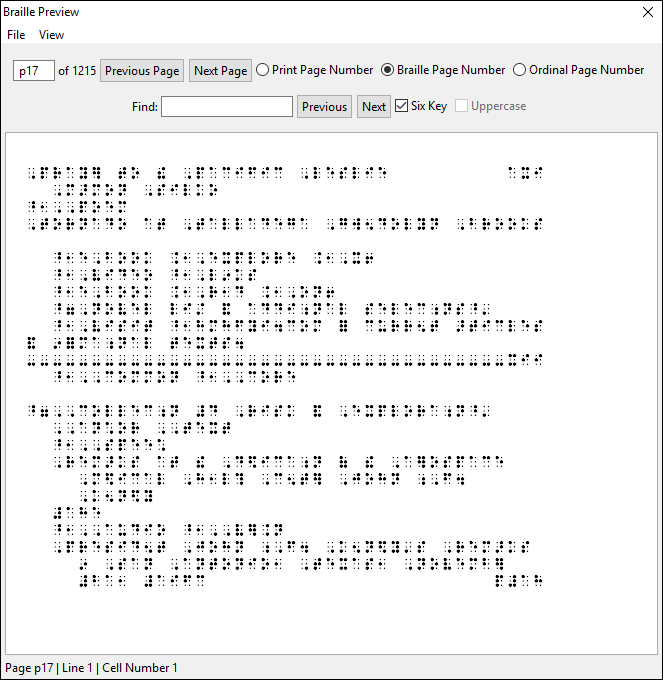
- Ordinal Page Number: The page number out of the total number of pages in your document, regardless of how the print and braille page numbers appear.
- Six Key: This checkbox allows a Six Key Input option for searching the text. If unchecked, ASCII should be entered to search.
- Uppercase: The uppercase checkbox only becomes available when a BRF is loaded into BrailleBlaster. When checked, it takes lowercase ASCII that BrailleBlaster produces in the Find textbox and uses it to find uppercase ASCII that is in the document. This is important because some BRFs use uppercase ASCII to simulate braille while others use lowercase ASCII.
Use the Next and Previous buttons to find specific instances of text you are looking for. When a search reaches the end of the document, it restarts at the beginning.
The Braille Preview window also has a status line in the lower left corner that provides navigation help by displaying the page number (based on your navigation selection), line number, and cell number the cursor is currently on. This information is accessible to screen readers.
Basic File Operations
BrailleBlaster makes creating, opening, and saving files easy through the use of keyboard shortcuts.
Creating Files
When creating a new document, go to File > New or use the shortcut (Ctrl + N) to begin working in a new blank tab/page.
Pasting Text
You can copy text from another document and paste it into BrailleBlaster, including special symbols not available on the keyboard. All of the text automatically formats into the Body Text style (3-1 margins). Add additional formatting and print page numbers to your document using Styles the Page tool.
Creating an Original Document
If you are creating a document from scratch, you can type your text directly into BrailleBlaster. Formatting and editing can be applied as you create your document.
Opening Files  
If you want to open a file in BrailleBlaster or continue working on a file you have already created, go to File > Open or use the keyboard shortcut (Ctrl + O) to open the file.
BrailleBlaster opens many different types of files. When you select Open in the File menu, a list of the recognized file types is displayed.
Note: LaTeX will be converted into ASCII Math when opened in BrailleBlaster except in NIMAS XML, TXT, BRL, and ZIP file types.
- BB XML (*.bbx)
- BB Archive (*.bbz)
- Braille Ready File (*.brf) *Note:* When BrailleBlaster opens a BRF, it opens in the [[#Previewing Your File as an Embossed Braille Document|Braille Preview]] window and no changes can be made to the file.
- Braille text (*.brl)
- Microsoft Word files (*.docx)
- EPUB e-books (*.epub)
- HTML files (*.htm or *.html)
- Markdown files (*.md)
- Open Document files (*.odt)
- LaTeX files (*.tex)
- Text files (*.txt)
- XHTML files (*.xhtml or *.xhtm or *.xht)
- NIMAS XML files (*.xml)
- NIMAS zipped files (*.zip)
Using a NIMAS XML File
Within a NIMAS XML file, some of the print may be automatically formatted to the correct style for the braille document, such as print and braille page numbering, designation of headings, identification of tables, lists, and more. These automatic formats may need to be changed manually to ensure the print formatting correctly matches the braille formatting. For example, the headings may appear bold throughout the print file, but this font attribute is not needed in the braille transcription. For more information about working with NIMAS files go to the Operations Specific To NIMAS Files section.
If your file contains MathML, it is converted to ASCII Math and translated into your chosen math braille code.
Saving Files  
There are several unique file types that BrailleBlaster uses when saving a file.
BrailleBlaster XML File (BBX): XML stands for eXtensible Markup Language. By default, BrailleBlaster saves your file as a BBX, which is specific to BrailleBlaster. Save retains any changes made to a document, while Save As saves the current document as a new file, preserving the original document.
BrailleBlaster ZIP File (BBZ): This is a zipped NIMAS file set. When the ZIP file is saved, it saves as a BBZ. This allows images to remain in the file, making describing images with the Image Describer even easier.
Braille Ready File (BRF): BrailleBlaster allows files to be saved as a BRF. You can also save your file in the Portable Embosser Format (PEF). These are the file formats that are used to Emboss the document.
Note: You cannot edit a BRF or PEF in BrailleBlaster. Make desired changes before saving as BRF or PEF. You can download BrailleZephyr (a free and simple BRF editor) to edit BRFs.
To save a BRF or PEF, go to File > Save BRF/PEF. Selecting this option does one of two things depending on whether or not Volume Breaks have been inserted into the document.
If there are no Volume Breaks in your document, selecting Save BRF/PEF saves your entire document as a single BRF or PEF. It opens the Save window and allows you to name your file.
If Volume Breaks have been inserted, a window opens which gives you two options for how to save your BRF or PEF.
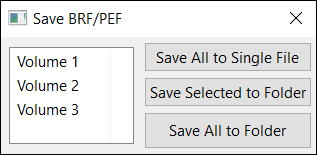
- Individual Volumes: Individual volumes may be saved as separate files.
- Select the volume to save from the list and click the Save Selected to Folder button.
- Type the name of the file in the edit field of the Save window.
- Multiple Volumes: Multiple volumes may also be saved as separate files. The default file name for each volume is the name of the document followed by the volume number (Ex: Literature_volume1.brf).
Volume types include Preliminary and Supplemental (identified as Preliminary or Supplemental plus the number of the volume) or Normal (which is identified as Volume plus the number of the volume). Volume type is determined when the volume is inserted (see Insert Volume). For example, a file called Literature.bbx with two volumes, one preliminary and one normal, would automatically have two saved brfs: One titled Literature_preliminary1.brf and another titled Literature_volume1.brf.
To save multiple volumes:- Hold the Ctrl key and select the volumes from the list.
- Click the Save Selected to Folder button.
- Select the destination for the saved volumes from the file browser.
Note: Alternatively, you can save all the volumes as individual BRFs or PEFs in a single folder by clicking the Save All to Folder button.
For more information on inserting, changing, and deleting volumes within the document see Working with Smart Volumes.
For more information about BRFs within BrailleBlaster, see Previewing Your File as an Embossed Braille Document.
Creating Multiple Saved Files
You can save your original file as separate files, allowing multiple transcribers to work on different parts of the book at the same time. Once the transcription is finished, all the separate files can be rejoined into one complete file, ready to emboss. This only works for files that contain sections designated by the publisher, such as a NIMAS XML file. Instructions for saving split files can be found in Dividing a NIMAS File into Multiple Files.
Navigating Files
BrailleBlaster has many tools to help you successfully navigate through your file. If you are using a NIMAS file, the Book Tree is the most useful tool for navigation, but other tools can be used to navigate any file.
Navigating to the Beginning of Your File
Home allows immediate navigation to the beginning of your document.
Go to Navigate > Home or use the keyboard shortcut (Ctrl + Home). This places the cursor at the very beginning of the document, before the first word on the first page.
Navigating to the End of Your File
End allows immediate navigation to the end of your document.
Go to Navigate > End or use the keyboard shortcut (Ctrl + End). This places the cursor at the end of the file, after the last word on the last page.
Navigating to a Particular Page
Go to Page allows you to navigate to a specific page in your document. This is helpful for long documents that are difficult to navigate simply by scrolling. Alternatively, you can also use the Find and Replace feature to search your document if you are looking for a specific word or type of formatting in your document.
To navigate to a particular page:- Go to Navigate > Go To Page or use the keyboard shortcut (Ctrl + G).
- Select the type of page you want to use to navigate:

Print Page: The page number normally displayed in the top-right corner of a braille page.
Braille Page: The page number normally displayed in the bottom-right corner of a braille page.
Ordinal Page: The page number out of the total number of pages in your document, regardless of how the print and braille page numbers appear.
Note: If your document has Volume Breaks, you can search for a specific braille page within a single volume rather than the entire file.
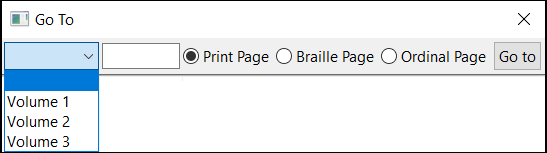
- Type the desired page number in the textbox and select Go To to complete the action.
Note: If you have made changes to the page numbers in your file, you can also quickly navigate to those pages you have changed through the Page Change List in the Page Number Dialog. See Viewing Page Number Changes for more details.
Navigating Through Text Elements
Previous Element and Next Element allow you to navigate through each text element designated in the Style View. This lets you to move more quickly through the document compared to line-by-line navigation using the up and down arrows.
- Go to Navigate > Previous Element or Next Element, or use the keyboard shortcuts (Ctrl + Up) for Previous Element and (Ctrl + Down) for Next Element.
- This places the cursor at the beginning of the previous or next element in the Style View allowing you to make changes to the style and ensure the correct style is applied to each element of text.
Setting up Your Document
Before getting started on your transcription, there are some basic settings you might need to adjust in your document, such as which Braille code to use, how the page numbers should appear, how many braille lines per page, if you need a running head, and so on.
Setting Braille Translation
Go to Settings > Translation Settings
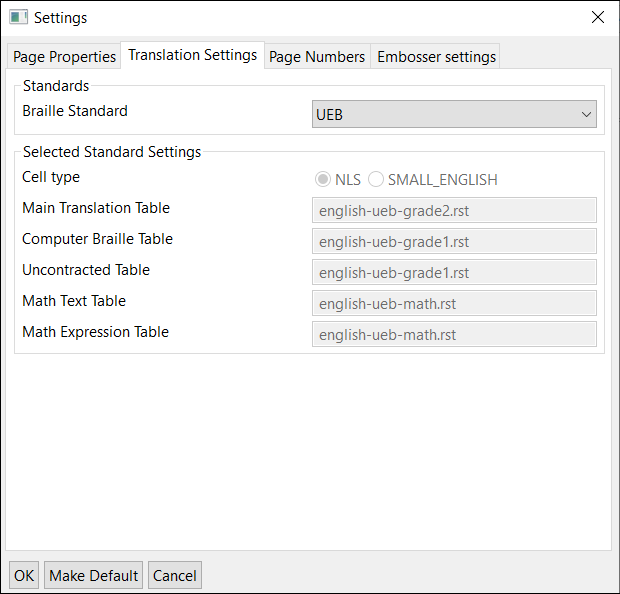
The default translation setting for BrailleBlaster is UEB, but other translation options include: UEB Uncontracted, UEB with Nemeth (Contracted and Uncontracted), EBAE (Contracted and Uncontracted), Spanish US, and Cherokee Plus Nemeth.
Setting Page Numbering and Interpoint
Go to Settings > Page Numbers
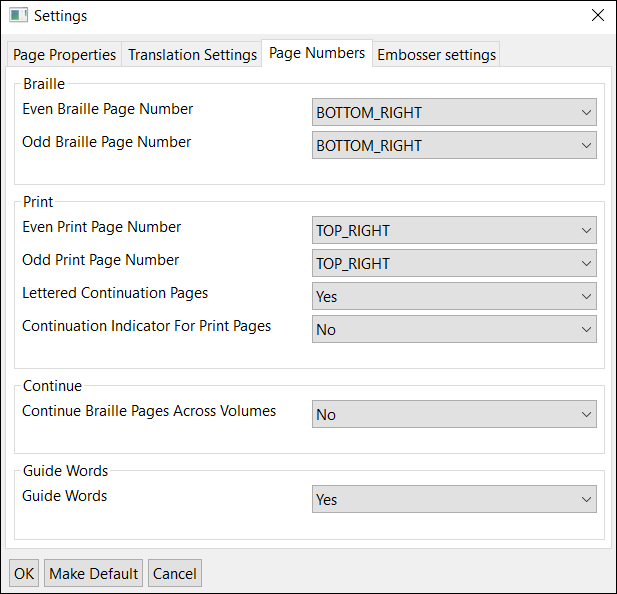
There are options for making a document Interpoint (embossed on both sides of braille paper) or Single-Sided.
Depending on your agency, they may have different requirements for Page Numbers. You can choose the placement of both Braille and Print Page numbers, how you want continuation indicators for your print pages, and whether you want continuing pages.
Adjusting Page Properties and Margins
Go to Settings > Page Properties
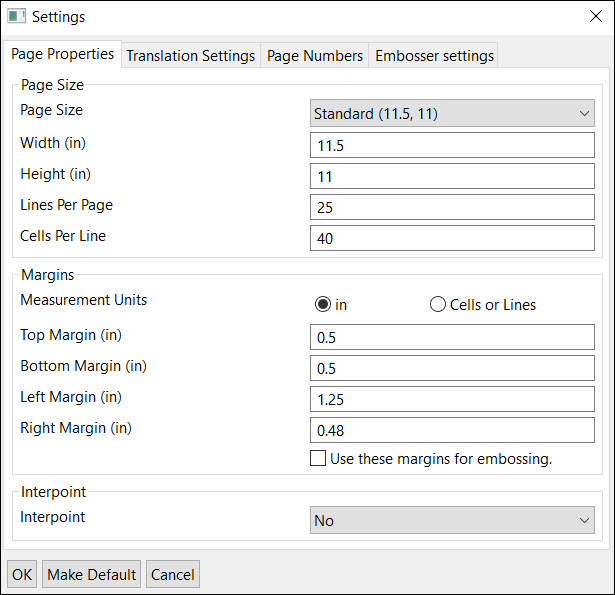
From here you can set your Page Size, Lines Per Page, Cells Per Line, and Margins of your document. You can also change whether you want your margins to be represented in inches or by cells or lines.
The Page Size default is set to 11.5” x 11”; Margins defaults are set to top 0.5”, bottom 0.5”, left margin 1.25”, right margin 0.48”.
Once you have chosen your desired settings for the Translation Settings, Page Numbers, and Page Properties, you can select OK or Make Default if you want the changes to be applied to future documents. If you do not wish to save your changes, select Cancel.
Setting a Running Head
The Running Head tool allows you to add a Running Head to your document on all braille pages except for t1 and braille page 1. The default is for no running head, as it is not needed for all transcriptions.
- Go to Insert > Running Head. This opens a small window.
- The option No Running Head is automatically selected. Select the radio button Enter Title and type the Running Head into the textbox.
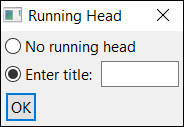
- Select OK to save your changes.
Note: Before entering the Running Head, you should confirm that the running head length fits at the top of the page and works for all print page numbers as required by Braille Formats, 2016.
Printing and Embossing
Setting up a Printer
- Go to File > Print or use the keyboard shortcut (Ctrl + P) to open the Print window.
- Under Select Printer any printer connected to your computer should automatically be listed. However, if your printer does not show up, use the Find Printer button.
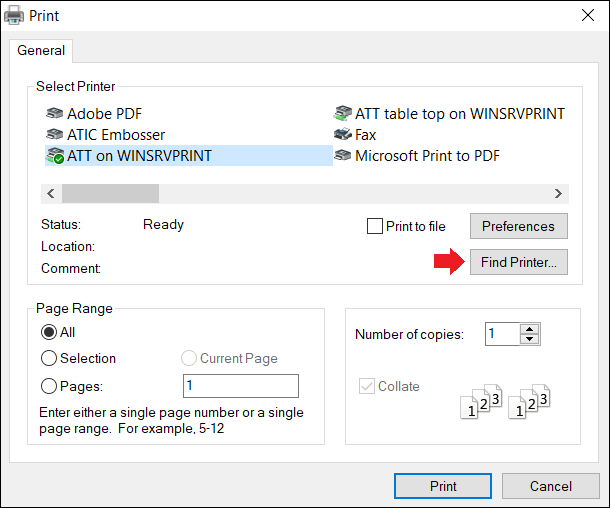
- Select the Print button to print the Print View of your document.
Printing a Document  
- Go to File > Print or use the keyboard shortcut (Ctrl + P) to open the Print window.
- Select a printer.
- Customize your print job with Page Range and Number of copies.
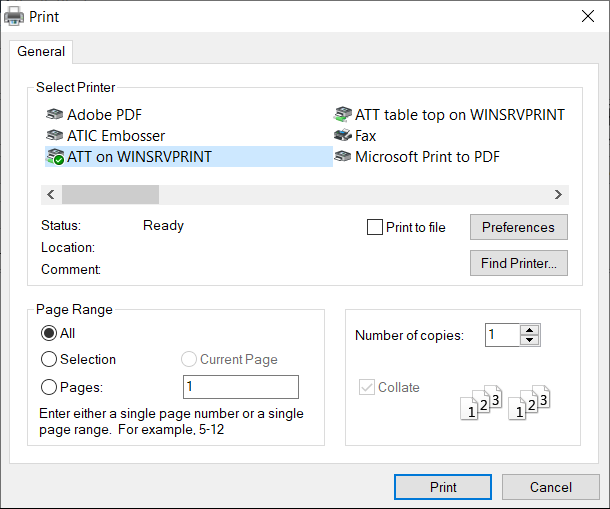
- Click the Print button to send your file to the printer.
Setting up an Embosser
- Go to Settings > Embosser Settings to select a default embosser, or to add or remove an embosser.
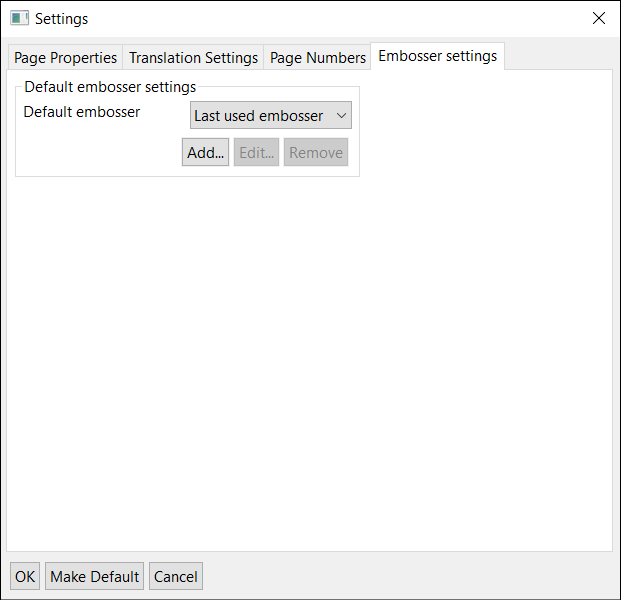
- Complete the fields in the Edit embosser window to configure your embosser profile.
- Click OK to complete your embosser profile set up or click Cancel to close the window without saving any changes.
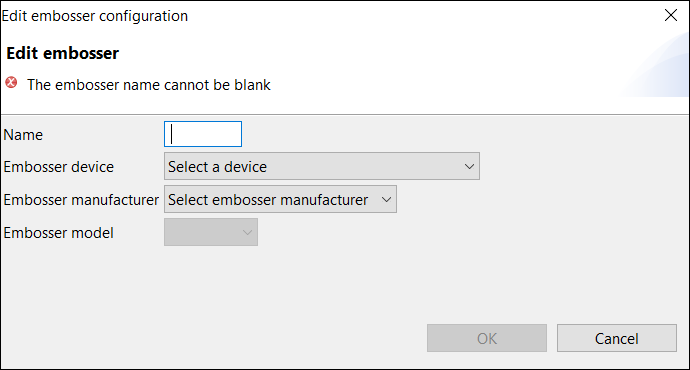
Edit Embosser Fields
Name: The name can be as long as you want to identify the embosser, but BrailleBlaster only displays a limited number of characters.
Embosser Device: Select your embosser of choice from the dropdown list of all available printers and embossers.
Embosser Manufacturer: Select your embosser's manufacturer from the following choices. Listed after each manufacturer are the available models.
- ViewPlus Technologies:
- EmBraille
- Columbia
- Delta
- Premier
- Elite
- Emprint
- SpotDot
- Max
- Cub
- Cub JR
- Generic: Three options are available.
- Text only: This option is used if your embosser model is not supported by a specific driver. BrailleBlaster assumes that the page size, margins, interpoint, and other settings have been set on the embosser itself.
- Text with margins: This option is similar to the Text only option, except that extra spaces are added in the braille to create margins.
- Graphics Embosser: This option is for embosser models that support graphics embossing. This feature is in beta and, therefore, not fully supported across all possible models. It is supported by the ViewPlus family of embossers.
- IRIE:
- Braille Buddy
- Braille Sheet 120
- Braille Trac 120
- Index Braille:
- Basic-D V5
- Basic-D V4
- Everest-D V5
- Everest-D V4
- BrailleBox V5
- BrailleBox V4
- Fanfold V5
- Enabling Technologies:
- Phoenix Gold
- Phoenix Silver
- Cyclone
- Trident
- BookMaker
- Braille Express
- Thomas
- Thomas Pro
- Juliet Classic
- Juliet Pro
- Juliet Pro60
- ET
- Romeo Attache
- Romeo Attache Pro
- Romeo Pro50
- Romeo 25
- Romeo 60
- Juliet 120
- Braillo:
- Braillo 200
- Braillo 400S
- Braillo 400SR
- Braillo 600
- Braillo 600SR
- Braillo 270
Note: If you do not know your embosser's manufacturer, it is recommended you select Generic.
Embosser Model: Select from the available Embosser models, listed above. This varies depending on which manufacturer you chose.
Paper Size: Select the paper size on which you wish to emboss. The dropdown menu provides a number of paper sizes.
Note: Standard braille paper is 11” x 11.5”.
Embossing a Document  
After completing the steps in Setting up an Embosser, you can begin the process of embossing your file.
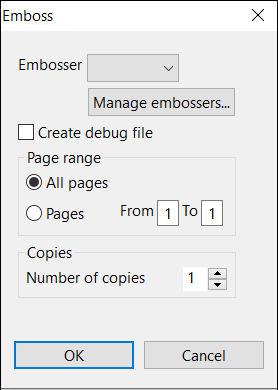
- Go to File > Emboss or use the keyboard shortcut (Ctrl + E) to open the Emboss window.
Note: If you have not embossed in BrailleBlaster before, you are prompted to set up a profile for your embosser. See Setting up an Embosser.
- Select your embosser, the number of copies you wish to emboss, as well as the page range (All or a range between 1 and the final page of the document).
Note: You can change the embosser settings at any time by clicking the Manage Embossers button, which opens Embosser Settings window.
- Click OK to emboss or click Cancel to close the window.
Automated Features and Tools
BrailleBlaster is equipped with many innovative and unique features that help speed up the transcription process.
Generating T-Pages
Transcriber generated pages are braille pages created by the Transcriber containing information about the document, as well as braille information that would not normally be included in the print text. The T-Page Generator makes it easier to add the “front matter” according to Braille Formats, 2016.
Note: For the best results, it is recommended that you use the T-Page Generator AFTER completing the transcription of the entire document, including adding Volume Breaks if your document is being split into more than one volume. This is important because BrailleBlaster uses Volume Breaks to insert the T-pages into their correct location in a document.
Go to Tools > T-Page Generator. This opens the Create Transcriber-Generated Pages window.
There are four tabs at the top of the window titled:
- Title Page 1
- Title Page 2
- Special Symbols
- Transcriber’s Notes
How each tab should be filled out is discussed in corresponding sections.
The buttons at the bottom of the window remain consistent regardless of which tab is open:
- Volume Navigation (Previous Volume/Next Volume): If your document has more than one volume, you can make specific changes to each volume using these navigation buttons.
- Copy Current Volume: This button copies all of the current changes added to the T-Page Generator and adds the current volume’s T-pages to all volumes of the document.
- Ok: Selecting this option saves all changes made in the Create Transcriber-Generated Pages window.
- Cancel: Selecting this option closes the Create Transcriber-Generated Pages window without saving any changes.
Note: If T-Pages are edited in the Print View after they are created, rather than in the T-Page Generator window, the edits in the Print View are lost when the T-Page Generator window is opened again.
Creating a Title Page
Note: If T-Pages are edited in the Print View after they are created, rather than in the T-Page Generator window, the edits in the Print View are lost when the T-Page Generator window is opened again.
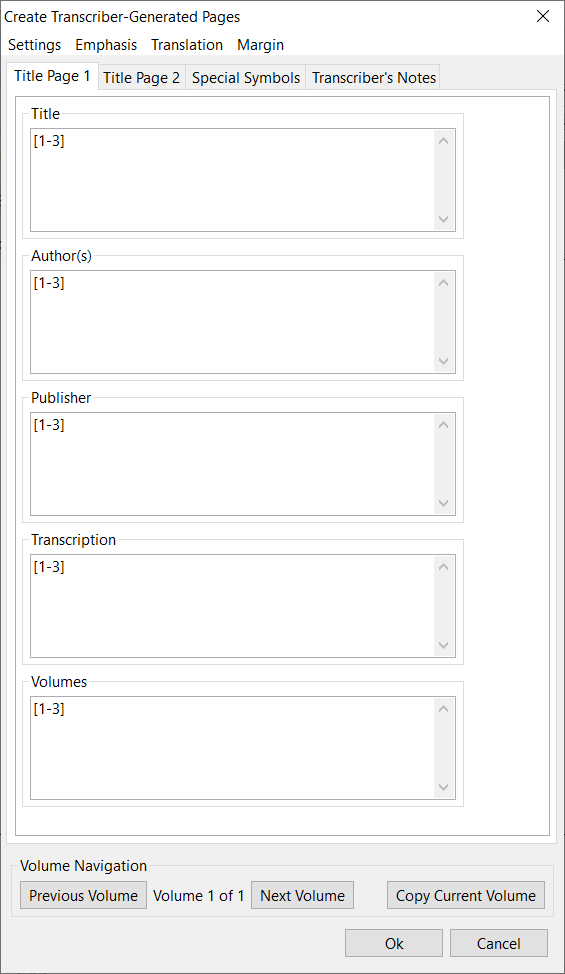
- Select the Title Page 1 tab. There are several textboxes that need to be filled in to complete this page:
- Title: The title and subtitle of the document
- Author(s): The author(s) of the document
- Publisher: The publisher information
- Transcription: The “Transcribed by” information
- Volumes: The Volume and Page information
Note: The formatting and content of these text fields is explained in more detail in Braille Formats, 2016.
- Fill in each textbox with the appropriate information. Then, edit the entries using the drop-down menus, if necessary.
- Settings: Use this tool to center your title page if that is required by your agency.
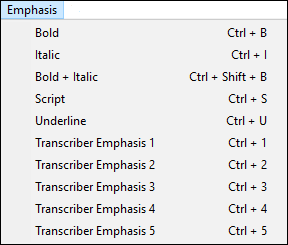
- Emphasis: Use this menu to add Bold, Italics, Bold + Italics, Script, Underline, or Transcriber-Defined Typeforms 1-5 to any piece of text.
- Translation: Use this tool to have Uncontracted or Direct translation within the T-Page Generator.
- Margin: Use this tool to adjust the margins of text. The default is 1-3.
- Select OK to save your changes to Title Page 1 and see how it is formatted in the [[#Toggle Views|Braille View]]. Once the appropriate changes have been made to Title Page 1, you can move on to Title Page 2; or if your document does not require Title Page 2, you can move on to Transcriber’s Notes.
Creating a Secondary Title Page
Note: If T-Pages are edited in the Print View after they are created, rather than in the T-Page Generator window, the edits in the Print View are lost when the T-Page Generator window is opened again.
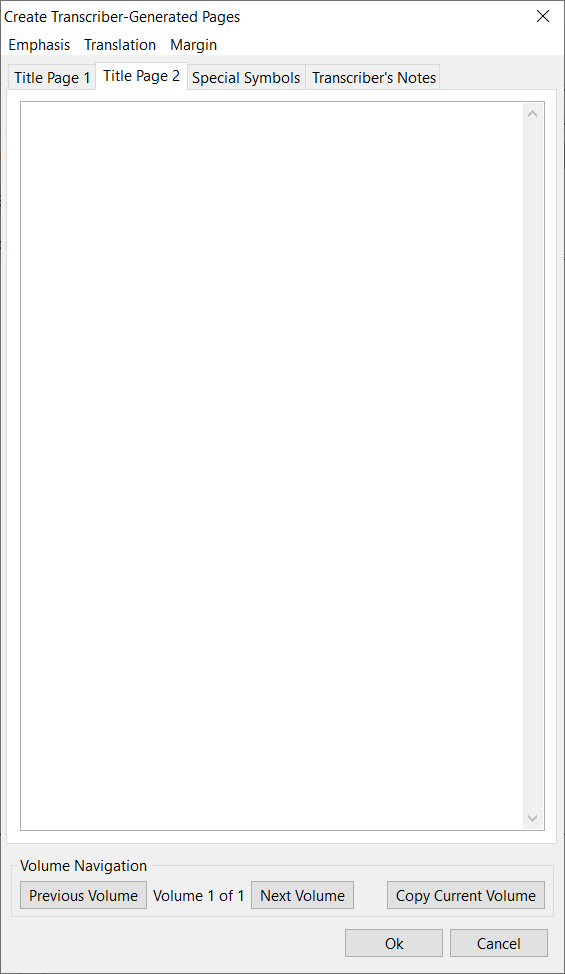
A secondary title page may be required based on the braille format or agency standards.
- Type your text into the Title Page 2 textbox. You can also edit your text using the Emphasis, Translation, and Margin drop-down menus as on Title Page 1.
- Select OK to save your changes to Title Page 2 and see how it is formatted in the Braille View. Once the text has been added to Title Page 2, you can move on to Transcriber’s Notes.
Creating the Transcriber's Notes Page
Note: If T-Pages are edited in the Print View here after they are created, rather than in the T-Page Generator window, the edits in the Print View are lost when the T-Page Generator window is opened again.
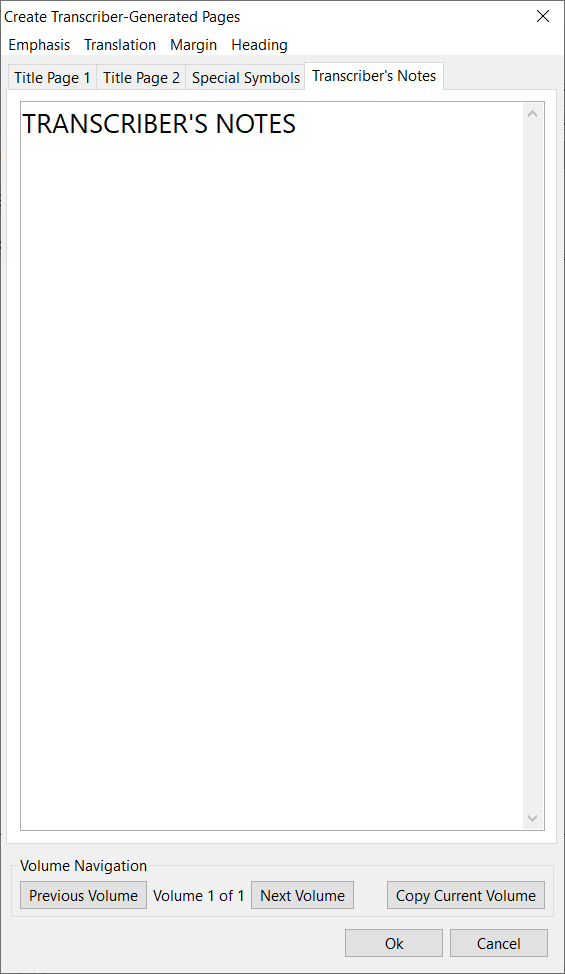
- Type any required text into the Transcriber’s Notes Page textbox. The text “TRANSCRIBER’S NOTES” is automatically placed in the textbox as a centered heading. If you need another centered heading, use the Heading drop-down menu. You can also edit your text using the same Emphasis, Translation, and Margin dropdown menus as on Title Page 1 and Title Page 2.
- Select OK to save your changes to the Transcriber’s Notes Page and to see how it is formatted in the Braille View. Once the text has been added to the Transcriber’s Notes Page, you can move on to Special Symbols.
Generating the Special Symbols Page
It is important to check if your document requires Volume Breaks BEFORE you begin work on the Special Symbols page since Special Symbols are arraigned by volume.
Note: If T-Pages are edited in the Print View here after they are created, rather than in the T-Page Generator window, the edits in the Print View are lost when the T-Page Generator window is opened again.
Adding Special Symbols
Adding Special Symbols in BrailleBlaster is easy to do. Watch our video: Adding Special Symbols Using the T-Page Generator for additional help.
To add Special Symbols:
- Click the Insert Prefix button in the Special Symbols tab to create a prefix for your special symbols list. This edit box lets you control what, if any, prefix symbols come before each symbol listed on the Special Symbols page. The Rules of UEB require the “Dot locator for mention” symbol to precede each symbol on the list, and the Prefix field defaults to this symbol (.= in ASCII).
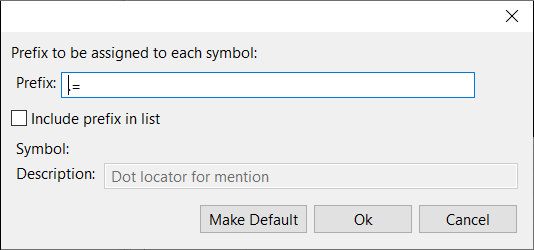
- Check the box “Include Prefix in the list” to add this symbol automatically to the list of Special Symbols.
- In the Symbol Description field, you can change the definition of the symbol. The default is set to "Dot locator for mention.”
- Click Ok to return to the T-page generator Special Symbols tab. The dot locator for mention is now added to the list of symbols.
- In the T-page generator Special Symbols tab, click the Auto Fill button. This opens a window with two radio buttons (and a warning that any symbols manually added to the T-pages before running the Special Symbols locator are overwritten when the process is ran).
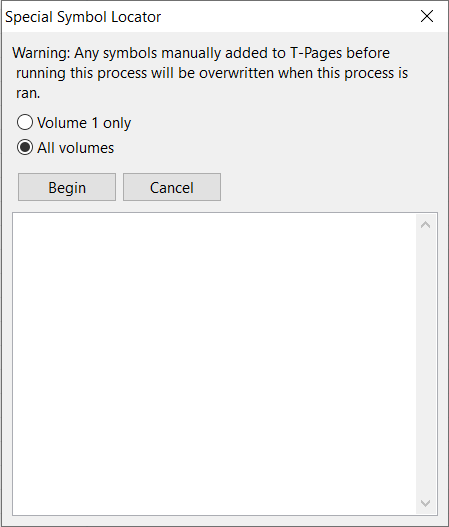
- Volume “X” only: The "X" in the Volume “X” only button represents the currently selected volume in the T-page Generator window. Use this tool for symbols that appear in a specific volume only, such as Transcriber-Defined symbols, without making any changes in other volumes.
- All volumes: The All volumes button is selected by default. Use this tool if you want all of the document’s special symbols added to every volume.
- Select either the Volume “X” only or All volumes radio button.
- Click Begin. BrailleBlaster searches the document for all symbols it recognizes as special symbols. When complete, the text "Completed special symbol search” is displayed at the bottom of the list.
- Click Continue. A new window open that reads "The following special symbols were found:" and lists the symbols BrailleBlaster has detected in ASCII followed by the symbol’s name.
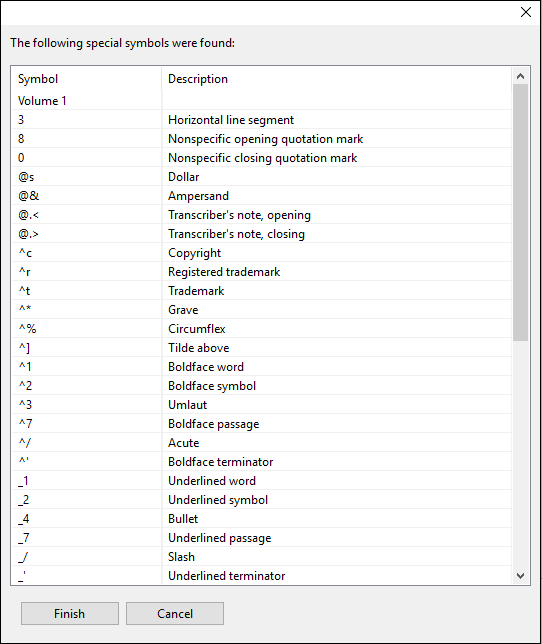
- Click Finish to close this window and return to the Special Symbols tab of the T-page generator.
- Click Ok. This closes the T-Page Generator window, and BrailleBlaster processes the new pages you've created. When complete, you see the new pages inserted at the top of each volume.
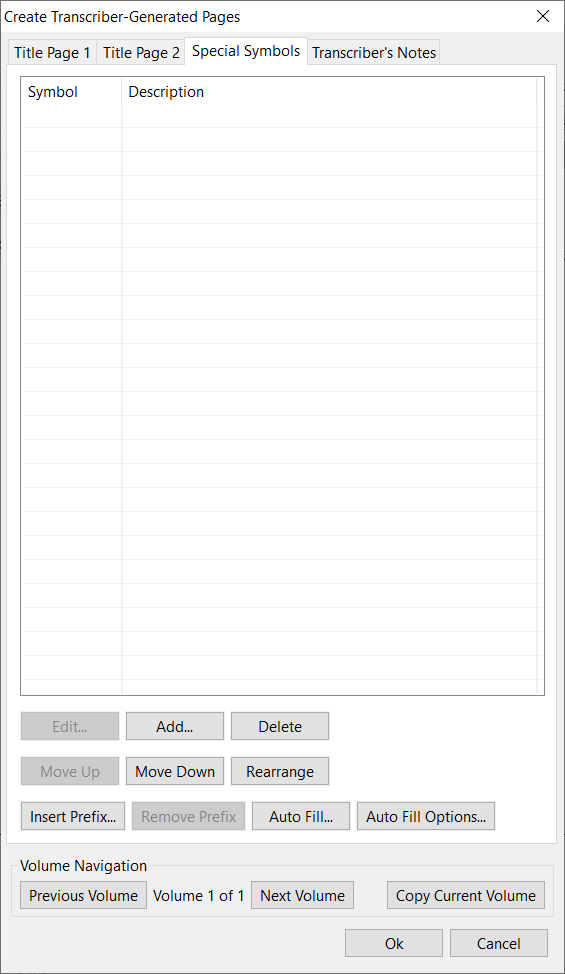
Making Changes to the Special Symbols List
While BrailleBlaster automatically finds your Special Symbols for you, sometimes you may need to make changes to the symbols provided. You can add, edit, delete, and rearrange any symbols from your list according to your needs.
- Add: Allows you to add Symbols or Headings with the Type dropdown menu. You can also enter ASCII braille into the ASCII symbol textbox or your desired symbol. There is a Description field for the symbol, or you can pick a symbol using the Pick From List tool, which has a list of commonly used symbols.
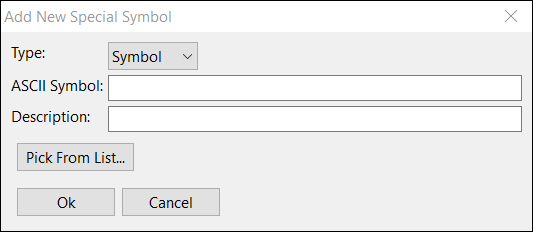
- Edit: Allows you to edit a special symbol in the list by selecting it and then clicking Edit. This opens the same window as Add, allowing you to edit all fields for the special symbol.
- Delete: Removes the special symbol from list.
- Move Up & Move Down: Moves a symbol either up or down in the list, according to where you want it to be located.
- Rearrange: Automatically rearranges the symbols in order of complexity, in accordance with The Rules of Unified English Braille and Braille Formats 2016.
Editing How Special Symbols Are Automatically Found
There are several tools in the Special Symbols section of the T-Pages Generator that allow you to edit and add rules to special symbols.
Note: If T-Pages are edited in the Print View here after they are created, rather than in the T-Page Generator window, the edits in the Print View are lost when the T-Page Generator window is opened again.
To open the current special symbols list, select the Auto Fill Options button in the T-Pages Generator under the Special Symbols tab. The special symbols are displayed in ASCII.
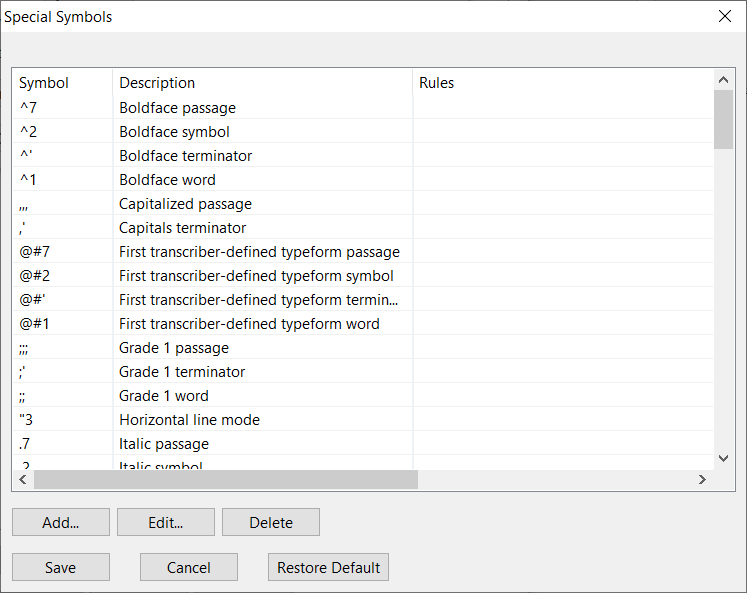
There are six buttons below the list that all perform different functions:
- Add: Opens up a window with two blank fields: Symbol and Description. Here you can add your own special symbol (in ASCII) and its description. This is useful if you are using an unusual or original symbol (such as a Transcriber-Defined symbol) or if BrailleBlaster failed to detect a symbol in Auto Fill.
- Edit: This feature allows you to select a symbol in ASCII and change the Description.
- Delete: Select a symbol from the list, then click this button to delete it from the list.
- Save: Click Save to close the special symbols list, saving any changes you have made such as adding new symbols, adding or changing rules for specific symbols, deleting symbols, or editing symbols/descriptions. This action returns you to the Special Symbols tab of the T-page Generator, with all your symbols displayed in the list.
- Cancel: Click Cancel to close the Special Symbols List window and return to the Special Symbols tab of the T-page Generator without saving any changes.
- Restore Default: Opens a Confirmation pop-up informing you that this action deletes all custom special symbols, and asks you to click Yes or No. Click Yes to remove all symbols you have added or edited through any of the functions described above. All default symbols detected and created by BrailleBlaster remain. Click No to cancel and return to the Special Symbols List window.
A unique aspect of Auto Fill Options is that you can edit the rules around the use of the special symbol through the Add and Edit buttons under the option, Edit rules. The Edit rules option opens a new window with three buttons:
- Add new rule: Allows you to add a new rule applying to the Special Symbol.
- Ok: Confirms the new rule for a Special Symbol.
- Cancel: Takes you back to the Add or Edit window.
To begin the process:
- Click Add new rule. This displays a drop-down menu containing 12 conditional phrases:
- Whole Word: The symbol needs to have a space before and after it, for it to be listed on the special symbols page.
- Not Whole Word: Can only be considered a special symbol if it is not standing alone or is partially connect to another symbol.
- Beginning of Word: Can only be considered a special symbol if it appears at the beginning of a word or it is preceded by a space.
- Not Beginning of Word: Is considered a special symbol if it appears anywhere except at the beginning of a word.
- End of Word: Can only be considered a special symbol if it appears at the end of a word or is followed by a space.
- Not End of Word: Is considered a special symbol if it appears anywhere except at the end of a word.
- Direct Translated: Is considered to be a special symbol only when the symbol is Direct translated.
- Not Direct Translated: Is considered to be a special symbol only when the symbol is not Direct translated.
- Followed By: Can only be considered a special symbol if this word is immediately followed by whatever is in the Option box.
- Not Followed By: Can only be considered a special symbol if this word is not immediately followed by whatever is in the Option box.
- Preceded By: Can only be considered to be a special symbol if this word is immediately preceded by whatever is in the Option box.
- Not Preceded By: Can only be considered to be a special symbol if this word is not immediately preceded by whatever is in the Option box.
- Select one of the 12 conditional phrases. To the right of the drop-down menu is a textbox labeled Option. This box is unavailable for most of the options in the drop-down menu, except for the following:
- Followed By
- Not Followed By
- Preceded By
- Not Preceded By
When any of these options are selected, you can type in the Option box. You can use this edit field to have BrailleBlaster look for certain ASCII symbols preceding or following the symbol to help define it from surrounding text.
- (Optional step) You can check the Always box to instruct BrailleBlaster always to interpret a certain symbol with the selected rule.
Note: For a symbol with an Always rule to appear on the Special Symbols page, the conditions of all Always rules for that symbol must be met. If the Always box is not checked, then the rule is considered optional. In other words, you can apply multiple rules to a symbol, but only one of the conditions has to be met for that symbol to appear on the Special Symbols page unless Always is checked.
- Click Add when you are satisfied with the rule or rules you’ve selected. This action returns you to the previous Edit Special Symbols Rules window
- Click Ok to save your changes or Delete to delete them.
Building the Table of Contents (TOC)
Note: It is advisable to complete the following work before opening the TOC Builder:
- Remove emphasis as necessary.
- Delete bullets as necessary.
- Format non-TOC elements that may appear within the TOC, such as sidebars and extraneous information.
- Insert volumes in the rest of the document using Insert Volume Break.
Creating a Table of Contents Entry
The TOC Builder in BrailleBlaster improves the creation of the Table of Contents (TOC) by speeding up and simplifying the process. It opens a set of tools that both applies the necessary margins and guide dots of a TOC and automates the process of dividing the TOC between volumes.
Go to Tools > TOC Builder. This opens a new set of TOC tools in the toolbar. From this toolbar, you can make all of the changes you need to your TOC.

To create a TOC Entry:
- Select the text from the print view.
- Select the TOC Entry button in the toolbar or use the keyboard shortcut (F4).
Note: Margins, blank lines, and if present, the page number are all formatted as a TOC Entry according to the rules of Braille Formats 2016.
Formatting a Table of Contents Entry
There are three ways to format TOC entries to create the TOC that you want. You can format TOC entries by:
- overriding the TOC margins
- creating TOC headings
- converting page numbers
Overriding the TOC Margins
When the Override Margin box is checked, a multi-leveled TOC can be created. The margins are determined by the numbers in the two text boxes to the right of the Override Margin checkbox.

When Override Margin is not checked, the margins are taken from the original style and the item is changed to a TOC item. An item with the style L1-3, for example, will become a T1-3. A multi-level list will become a multi-level TOC. Styles without numeric margins, such as body text will default to the base TOC style, T1-3. Headings will be converted to their TOC equivalent.
To override margins:
- Check the box next to Override Margin in the TOC toolbar.
- Fill in the text boxes to the right with your preferred Margins. The two text boxes represent your margin levels:
- Indent: Insert a number in the first text box to determine the braille cell where the element starts on the line. Entering an invalid number results in a warning "Invalid indent" and the style is not applied.
- Runover: Insert a number in the second text box to determine the runover of the element, or the starting braille cell for every line after the first line. Entering an invalid number results in a warning "Invalid runover" and the style is not applied.
Note: You must change the numbers in the textbox each time you want to set a different Margin. Example: If you want to create a TOC with 2-levels and your margins are 1-5 and 3-5, you must manually change them when creating your TOC.
Creating Table of Contents Headings
A TOC Heading differs from a normal braille heading because it is repeated when it is referenced in another volume.
- Place your cursor inside the text that you wish to make a TOC Heading.
- Go to the Headings dropdown menu in the TOC toolbar. There are four choices to choose from to create a TOC Heading:

- Centered: Creates a centered TOC Heading with blank lines before and after.
- Centered NB: Creates a centered TOC Heading with no blank lines.
- Cell 5: Creates a TOC Heading beginning in cell 5.
- Cell 7: Creates a TOC Heading beginning in cell 7.
- Select a heading style. The action automatically applies to the text where your cursor was located.
Converting Page Numbers
Find Page, Page Prefix, and Page Number are used to add page numbers into the TOC. The TOC Builder automatically locates page numbers that are Arabic or roman numerals if the Find Page checkbox is checked. It is not able to identify page numbers automatically that include letters (e.g., C13, IN32, G5, etc.).
To convert numbers to page numbers in the TOC:
- Make sure the Find Page checkbox is checked. If it is not checked, it cannot make a page number with guide dots even if there is a number at the end of the TOC Entry name.
- Type the prefix that comes before the page number into the Page Prefix textbox.
- Click the TOC Entry button OR use the keyboard shortcut (F4). The TOC Entry is formatted with the prefix and number at the right as a page number.
- If you have more than one prefix to label in the TOC, go back and change the text in the Page Prefix box and apply the TOC Entry to the next element.
Note: The Page Number tool can make any highlighted text a page number. Simply highlight what you want to appear as a page number and it is formatted with guide dots. This is useful for page numbers that are listed in the Table of Contents as “Back Cover” or other unnumbered locations in the text.

Disperse to Volumes
The TOC Builder is capable of dividing the TOC between Volumes. It does this using the Volume Break, Volume Split, and Disperse to Volumes tools.
Note: All volume divisions in the text should have already been made using Volume Break before using the TOC Builder.
To disperse the TOC between volumes:
- Click the Volume Split button in the TOC toolbar. This action inserts the text “TOC Volume Split Placeholder” in the TOC where the volume divisions are to occur. Do this for all the necessary volume divisions.

- Select the Disperse to Volumes button. This action changes the “TOC Volume Split Placeholder” text to the appropriate Volume number (e.g., Volume 1). Each subsequent volume contains the TOC entries and headings that are present in that particular volume, following the guidelines of Braille Formats 2016.

Note: If Disperse to Volumes is pressed before volumes are created in the text, a warning message appears alerting you to create volumes first.
Working with Tables
The Table tool and Table Editor in BrailleBlaster can help you create and reformat braille tables more efficiently than ever before.
Check out our Tables in BrailleBlaster video!
Inserting/Creating an Unformatted Table
There are two ways to create a Table: 1) enter information for your table manually or 2) use the Convert Text to Table tool to change regular text into a Table.
To create a table manually:
- Place the cursor where you want the table to begin.
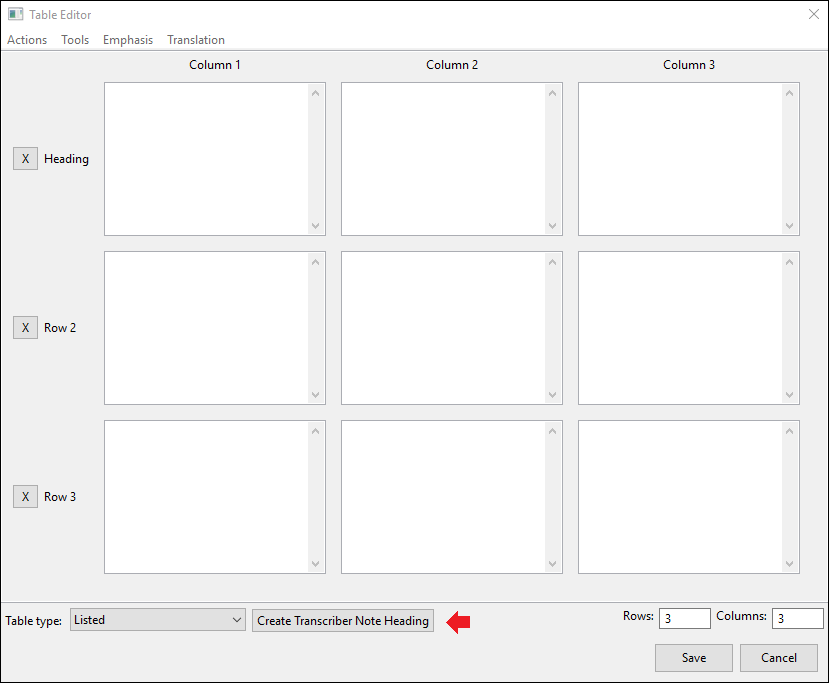
- Go to Insert > Table, which opens the Table Editor screen.
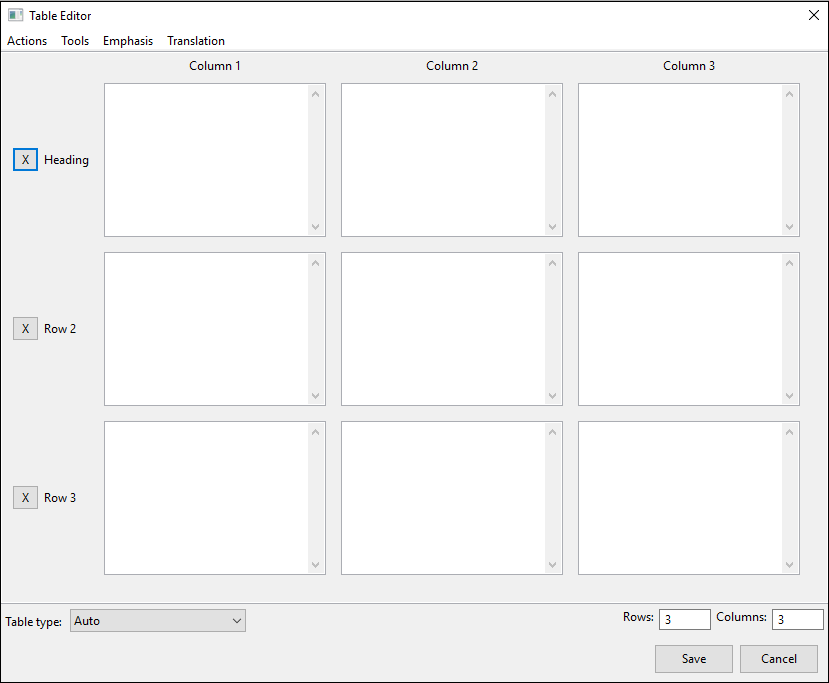
- In the lower right corner of the screen there are two textboxes labeled Rows and Columns. The default is 3 rows and 3 columns, but you can add or remove rows and columns by entering the number of Rows and Columns you want your table to have.
- Begin adding the text for each entry.
- (Optional step) To add Emphasis or a different Translation, use the dropdown menus from the toolbar.
- Tools: You can Swap Columns and Rows for better table fit; Add Emphasis to All or Add Math Translation to All to change all entries at once; or Remove All Emphasis from the table if emphasis is not necessary.
- Emphasis: You can use any of the forms of Emphasis that are found in the Emphasis toolbar in BrailleBlaster’s main window and apply them to text in the table.
- Translation: You can use Direct Translation, Uncontracted Translation, or Math Translation to change the braille translation to suit your needs.
Note: The keyboard shortcuts for creating Emphasis and making Translation changes are the same in the Table Editor as they are in the Print View of BrailleBlaster.
- Check that the Table type in the lower left corner of the window is on Auto and select Save. Your table is automatically formatted into the style type of table BrailleBlaster thinks is the best fit for the amount and length of the information in your table.
If you want to create a table from the text that is already in BrailleBlaster:
- Highlight the text elements that you want to change into a Table.
- Go to Tools > Convert Text to Table. This opens a small window asking how many columns you want your table to have.

- Click Ok. The Table Editor opens allowing you to edit your table as you see fit.
Creating Formatted Tables
BrailleBlaster can automatically create many types of tables, which can be selected from the drop-down menu labeled Table type in the lower left corner. These are arranged to match the formatting of tables outlined in Braille Formats 2016.
Make a Simple Table
The Simple table style sets the table to display as a standard braille table with columns and rows and a line separator beneath each column heading.
Make a Listed Table
The Listed table style changes the table format so that the Row fields become Cell 5 Headings while information in the Column Heading fields become the first part of each listed item, followed by a colon, which is inserted automatically. Information in the column fields is added after the colon for each appropriate list item.
Make a Stairstep Table
The Stairstep table creates a table format where each row is represented as a collection of text with indentions so that each column of the table is set at a different margin.
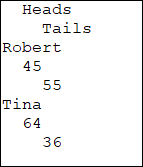
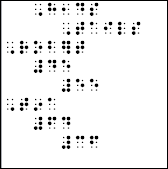
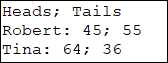
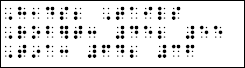
Make a Linear Table
The Linear table format places the Column Headings in a Transcriber’s Note before the text and each row is put into a linear list separated by colons and semicolons.
Editing Tables
Any changes to the text within a table must occur within the Table Editor, whether it is simply correcting a typo or adding columns and rows, as the text cannot be edited in the Print View. To use the Table Editor, the cursor must be placed inside text designated as a table. Otherwise, BrailleBlaster generates the error message “Cursor is not on table.” Some of the features can be used for any table, while others are specific to each table type.
Adding or Removing Emphasis
Within the Table Editor, any text can be changed to appear with Emphasis. You can add Emphasis by highlighting text in the table then selecting the type form from those listed in the menu.
If all of the text in the table needs emphasis added, you can go to Tools > Add Emphasis To All and choose from those same options. If emphasis needs to be removed from part of the text, select the text and apply the emphasis again. If the entire table is emphasized but should not be, you can remove all the emphasis at once if you go to Tools > Remove All Emphasis.
Changing the Table Translation
You can change the translation of the table by highlighting text in the table then selecting the preferred Translation from the menu: Direct, Uncontracted or Math. If the entire table needs to appear as math, go to Tools > Add Math Translation to All.
Edit a Simple Table
When the Simple table style is applied, a button appears to the right of the drop-down menu labeled Simple Table Options.
- Open the Simple Table Options. This opens a window with several tools for customizing your table:
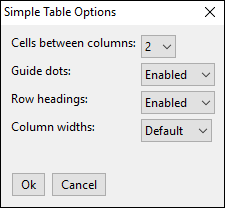
- Cells between columns: Choose either 2 cells between each column or 1 cell between each column. The default is 2.
- Guide dots: Controls whether guide dots appear after material in columns. Choose either Enabled or Disabled. The default is enabled.
- Row headings: Controls whether information in column 2 and beyond appears on the same line as any runovers in column 1. When enabled, materials in column 2 and beyond begin on the same line as the runover of the heading in column 1. When disabled, material in column 2 and beyond begin on the same line on which the heading starts. The default is enabled.
- Columns widths: Allows control over the cell width of individual columns. Choose either default or custom. When custom is selected, a set of editable fields appear below the drop-down menu, showing each column in the table. (More about column widths following step 2.)
- Click Ok to return to the Table Editor.
About Column Widths: In each field, the number displayed represents the number of braille cells that column takes up. Between each column is a number in parentheses, either a (1) or a (2). This number represents the number of Cells between columns. The fields can be edited to change the width of each column as desired.
The text Total Width: “X” is shown below the fields, where “X” is the total number of cells the columns, and the spaces between them, occupy on the braille page. This number automatically changes as the column widths are changed. This can be useful to ensure custom column widths do not exceed the width of the braille page.
Edit a Listed Table
When the Listed table style is applied, a button appears to the right of the drop-down menu labeled Create Transcriber’s Note Heading.
To edit a Listed table:
- Select the Create Transcriber Note Heading button. This action adds a text field to the top of the Table Editor allowing you to create a Transcriber’s Note explaining the format of your table.
- The 7-5 text field is set to the default text: “Print format is changed. Row headings are blocked in cell 5; column headings begin in cell 1. All headings are repeated for clarity. A colon separates headings from table entries.” This text can be edited to fit your document needs, and appears with 7-5 margins.
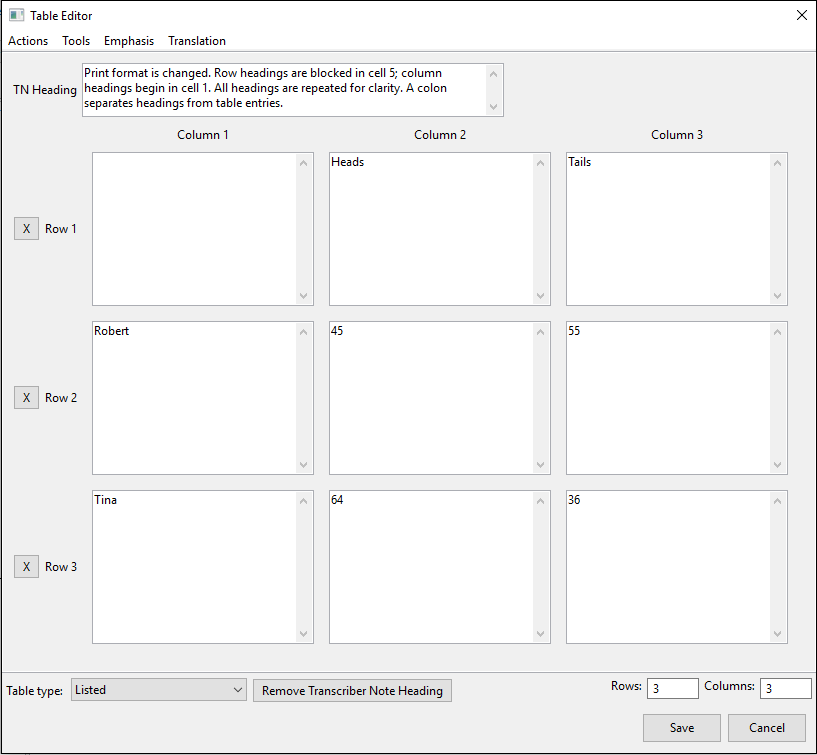
- Click Ok to return to the Table Editor.
Edit a Stairstep Table
When the Stairstep table style is applied, a button appears to the right of the drop-down menu labeled Create Transcriber Note Heading.
To edit a Stairstep table:
- Select the Create Transcriber Note Heading button.
- Edit using the text fields in the Table Editor to explain the format of your table.
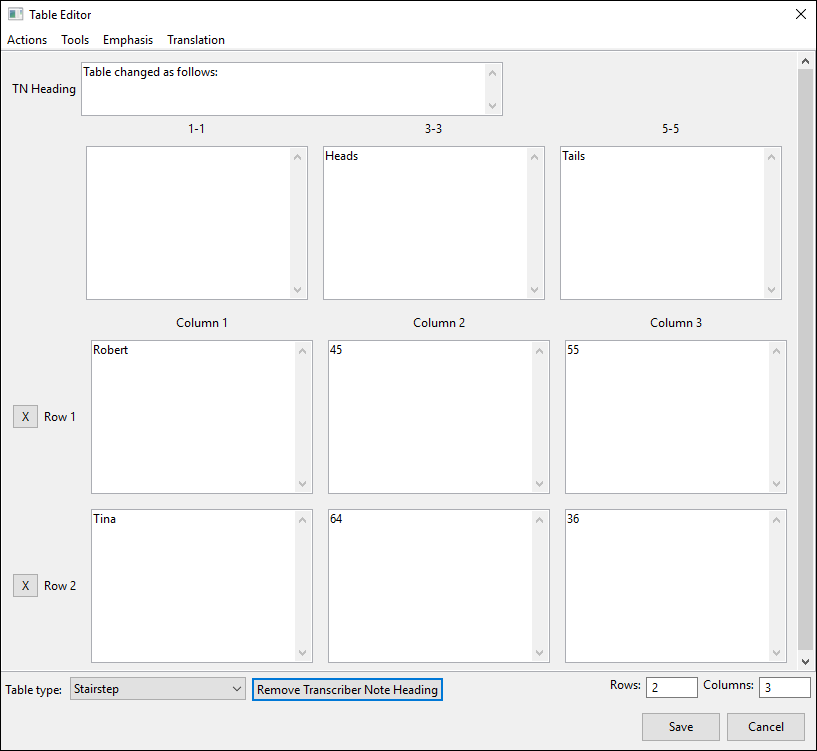
- 7-5: This first field with 7-5 margins is for the Transcriber's Note that precedes the table, informing the reader of the Stairstep format. The text defaults to "Table changes as follows:" but may be edited as needed.
- 1-1, 3-3, 5-5, etc: These next fields proceed in the standard Stairstep format. Each of these fields can be edited as needed.
- 3. Click Ok to return to the Table Editor.
Edit a Linear Table
When the Linear table style is applied, a button appears to the right of the drop-down menu labeled Create Transcriber Note Heading.
To edit a Linear table:
- Select the Create Transcriber Note Heading button.
- Edit using the two text fields in the Table Editor to explain the format of your table.
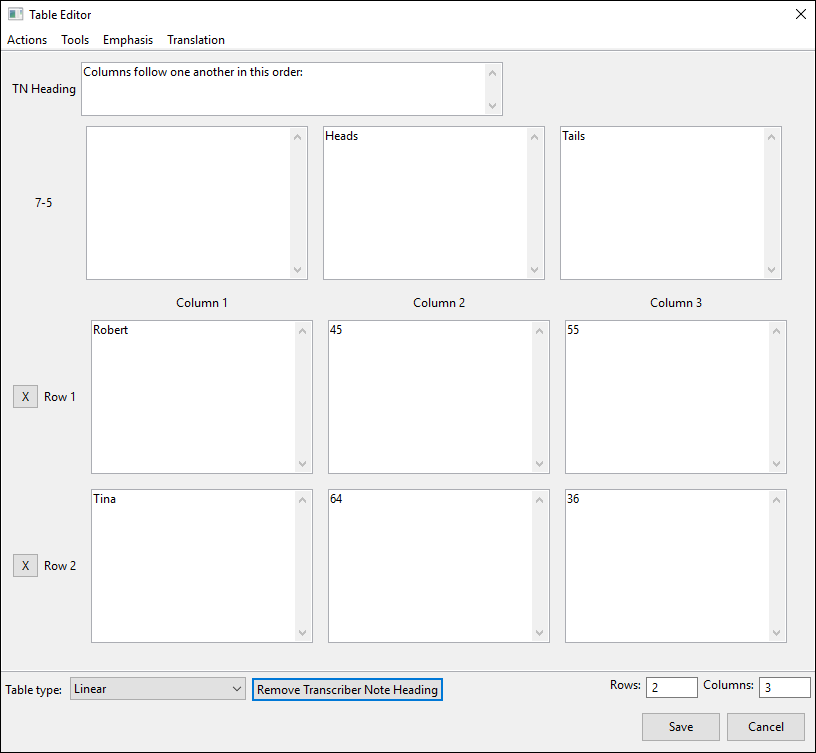
- 7-5: This field is for the transcriber's note with 7-5 margins informing the reader that the table format is changed.
- 1-3: This field with 1-3 margins is for the explanation of the column heading order. By default, the text of the column headings is automatically placed here in order, from left to right, with a colon following the first column heading and a semicolon following each additional heading.
- 3. Click Ok to return to the Table Editor.
Reformatting Tables
It is possible to reformat your table to another style type. There are two ways to reformat: Reformat Table and Advanced Reformat.
To reformat a table:
- Go to Actions > Reformat Table.
- A pop-up window opens that reads “Reformatting a table will convert the table formatting to plain text. Are you sure you want to continue?” Click Yes to continue or No to cancel.
- When Yes is clicked, a new window opens, displaying a list of styles. Select a style to have all the table text reformatted into that style.
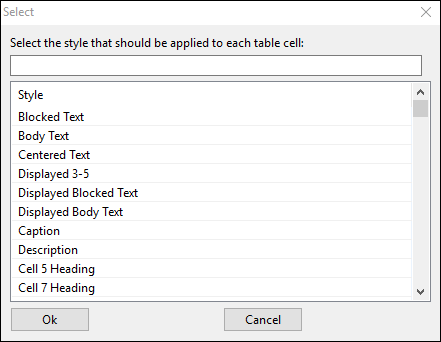
- Click Ok to confirm the style choice and reformat that table into normal text.
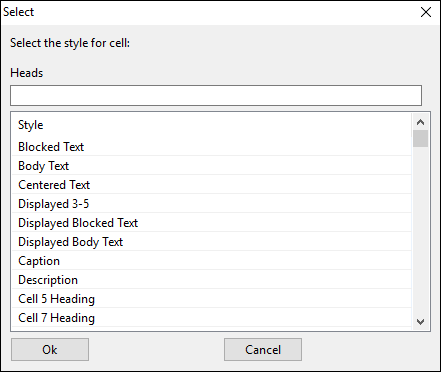
Advanced Reformat functions the same way as Reformat Table, but it allows each field of the table to have a different Style applied to it when the table is reformatted. The text from each cell of the table appears and you designate the styles individually.
If you decide you do not want to present information in a table, you can also remove the table completely. Within the Table Editor, go to Actions > Delete Table. The text of the table is completely removed from the Print View.
Working with Alphabetic References
There are many ways BrailleBlaster can help you create Alphabetic References, such as Glossaries and Indexes. This section explains how various BrailleBlaster tools work together to create Alphabetic References.
Selecting the Entire Glossary or Index
A lot of Alphabetic Reference tools work best if you select the entire Alphabetic Reference. In order to do so, you need to use the Style View.
To select a glossary or index:
- Find a Glossary or Index tag (i.e. G1-3, G3-5, etc.) in the Style View, and place the cursor inside an element with the Glossary tag.
- Make sure Breadcrumbs are visible. Go to View > Toggle Views and check Breadcrumbs.
- Within the Breadcrumbs view shown on the toolbar, click “Container List,” which comes before the Glossary style. This selects the entire Alphabetic Reference. This selects the entire Alphabetic Reference.
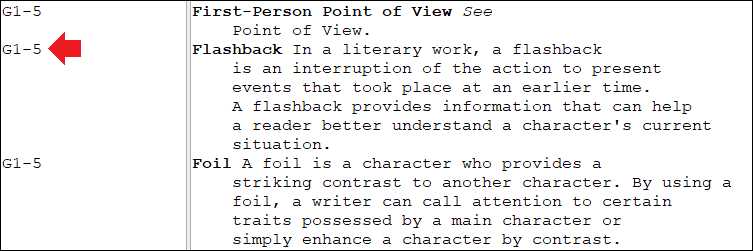
Adding Guide Words
You may not immediately see Guide Words in your document, even when a Glossary is correctly marked by the publisher.
To add guide words:
- Go to Settings > Page Numbers to check if Guide Words is set to Yes or No.
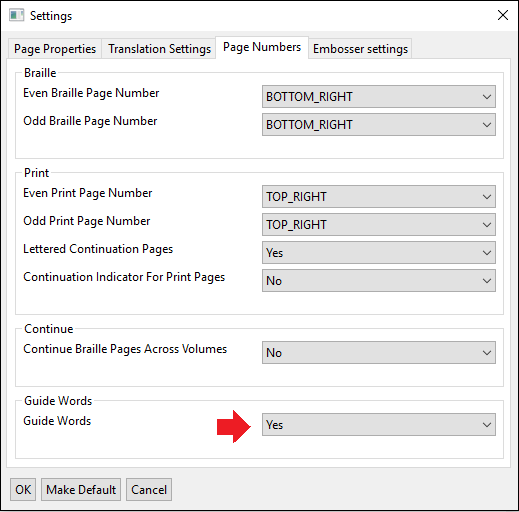
- If set to Yes, any properly marked glossary guide words are added automatically.
- If set to No, guide words do not appear and some guide word tools don’t work properly. Change the setting to Yes.
- Check the style options of your Glossary. To do this, select the entire Glossary (see [[#Selecting the Entire Glossary or Index|Selecting the Entire Glossary or Index]]).
- In the menu, go to Styles > Options > Guide Words > Yes. This ensures that each glossary item is set to have Guide Words included.
If you still do not have Guide Words, it means this particular Glossary was not coded as a Glossary in the source file. Indexes do not have Guide Words by default. You can still identify guide words manually. To do this:
- Select the entire Glossary manually.
- Go to Tools > Alphabetic References > Identify Guide Words.
Note: You many need to edit these guide words (see Editing Guide Words).
Editing Guide Words
Once Guide Words have been added, they can be edited.
Note: BrailleBlaster does NOT notify you if the guide words are too long to fit on line 25 with the necessary space before the braille page number. The guide words that are too long are cut off and have to be edited manually.
To edit guide words:
- Select the term you wish to edit from the glossary or index.
- You can either right-click on the word or go to Tools > Alphabetic Reference > Edit Guide Word.
Note: Right-click on the word in the list, not the Guide Word at the bottom of the braille page.
- A window opens that allows you to edit that Guide Word.
Remove Guide Words
The style option Guide Words is used to turn guide words on or off for a single element or several elements, but it does not affect guide words elsewhere in the text. If you need Guide Words to appear in one Alphabetic Reference but not another, you can remove the guide words for a particular section, even if the publisher has marked both sections to have Guide Words by default. This is useful when guide words appear in a section where your agency does not usually put them, but it is not feasible to turn off all guide words in the Setting menu, because they are still needed in other areas of the document.
To remove guide words from a section:
- Select the element(s) you want to change.
- Go to Styles > Options > Guide Words.
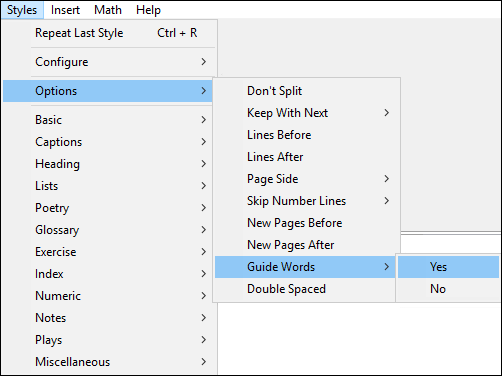
- Select Yes to make them Guide Words or No to remove them from being Guide Words.
Adding Alphabetic Divisions
The letters for each alphabetic section of an index or glossary require unique formatting. They are like a centered heading, but with only one blank line before, and none after. These can be easily added in BrailleBlaster.
To add an alphabetic division:
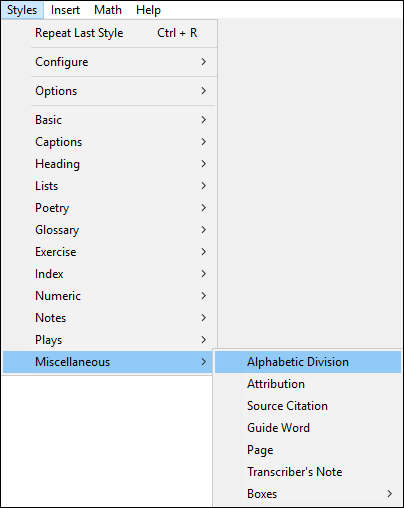
- Place your cursor on the line with your Alphabetic Division letter.
- Go to Styles > Miscellaneous > Alphabetic Division.
- Repeat for all alphabetic divisions.
Note: Ctrl + R or the  button repeats your last style, which is much faster than navigating the menu every time!
Adjusting Spacing for Alphabetic References
You can adjust the space between a term and a definition in an alphabetic reference. To do this:
- Select the entire Alphabetic Reference that needs the spacing adjusted, rather than selecting each element one at a time.
- Go to Tools > Alphabetic References > Adjust Term/Definition Spacing.
- A window opens with two radio buttons:
- One: Select this option for one space between the term and the definition.
- Two: Select this option for two spaces between the term and the definition.
- Select OK to save your changes.
Working with Glossaries with Pronunciation
Braille Formats 2016 recommends special rules for Glossaries. Many tools in BrailleBlaster can help accommodate these rules and ease making corrections to the translation.
Occasionally NIMAS files include images for complex diacritics in words with pronunciation. The Image Describer can replace these images with text. See Describing Images with the Image Describer for more details.
Sometimes diacritics do not translate into the correct braille because of the original file. For example, stress indicators may appear as an acute symbol, or the Latin letter ‘a’ with an acute symbol (á) appears as a Cyrillic ‘a’ (а). These types of errors can often occur throughout the entire file, but can easily be changed using the Find and Replace tool. See Finding and Replacing Text and Styles for more information.
Add Uncontracted Terms to Glossaries with Pronunciation
This tool adds the uncontracted form of an entry word to glossaries with pronunciations. If you have added them and later decided they are not needed, you can repeat these steps to remove all the uncontracted entry words.
- Select the entire Glossary.
- Go to Tools > Alphabetic Reference > Add/Remove Uncontracted Glossary Items.
Note: More information about selecting the entire glossary can be found in Selecting the Entire Glossary or Index.
Line Numbering
Line Number Tools adds a set of options to the toolbar for inserting line numbers into your document. This tool is primarily used for line numbered Prose, but it can be used for poetry as well. If you are using a NIMAS file and line numbers are present, BrailleBlaster may have automatically numbered the lines. If it did not, it is because the line numbers are not formatted as such in the original file.
Inserting Line Numbers
In order for BrailleBlaster to recognize the line numbers, the text in which they appear must first be wrapped in the Prose tag. This must be done in order for line numbers to show up in the Print and Braille Views. If you are adding line numbers to poetry, use the Poetic Stanza tag instead of the Prose tag when going through the line numbering process.
To insert a line number to Prose:
- Go to Tools > Line Number Tools. This action adds the Line Number Tools to the toolbar.
- In the Style View or Breadcrumbs, select the text where you want the line numbers displayed, or you can highlight the text in the Print View.
- To add the Prose tag, click the Wrap Prose button in the Line Number Tools toolbar OR use the keyboard shortcut (Ctrl + F2).
Note: Wrap Prose does not affect the text other than allowing it to display line numbers.
- Choose how to number the lines using either the Line Number or Increment by fields:
- Line Number: Use this field to set the initial line number for your text. Line numbers cannot have more than 10 digits. The default is 1.
- Increment by: This field allows you to set the increment by which all lines are numbered after adding the first line number. The default is 1.
Example: With the Increment by field set to 5, each time you insert a line number after the first, the number increases by 5. So you have 5 for the second line number, 10 for the third, 15 for the fourth, and so on.
- Select Insert OR use the keyboard shortcut (F2) to place those line numbers in the text.
Editing Line Numbers
If you need to edit or remove a line number, the Edit Line Number tool on the Line Number Tools toolbar can make those changes.
To edit a line number:
- Click on the text that contains the line number you want to edit.
- Select Edit Line Number from the Line Number Tools toolbar OR use the keyboard shortcut (Ctrl + Shift +F2). This action opens a window for editing the line number.
- Type the new number in the text field, or delete it to remove the line number completely.
- Click Apply to save the change.
- Click Previous or Next to cycle through the other line numbers in the wrapped section of text and edit as needed. Clicking these buttons also applys any changes you have made to the line numbers.
Note: If BrailleBlaster cannot find any more line numbers, the Edit Line Number window automatically closes.
- Click DONE, which closes the dialog.
Making Math
BrailleBlaster uses ASCII Math to create mathematical equations. If you are unfamiliar with ASCII Math, you can visit http://www.asciimath.org for a better understanding of how it works.
Check out our Basic Math with BrailleBlaster video!
BrailleBlaster provides support for both UEB Technical Material and UEB in Nemeth Contexts. You can select your default math translation table from the Settings > Translation menu.
Document types that are supported by Pandoc and include LaTeX are also supported by BrailleBlaster. LaTeX documents opened in BrailleBlaster maintain formatting, math, and so on from the original document and does not require LaTeX software to be installed on the system.
In some cases there may be packages or specific LaTeX notation not supported by BrailleBlaster. If you encounter this, we suggest that you convert the document to HTML using another application, and then open the HTML file in BrailleBlaster. TeX4HT, is an example of a LaTeX-to-HTML conversion tool. It integrates with the standard LaTeX compiler, thus offering very good LaTeX support.
Note: XHTML files produced by TeX4HT have the .xht file extension. You must change the .xht extension to .xhtml so BrailleBlaster recognizes the file.
To install and use TeX4HT, go to the website Producing HTML and MathML from LaTeX by using tex4ht.
Editing Math
When transcribing Math material, it is helpful to first turn on the Math toolbar icons.
Go to View > Toolbar > Math. When Math is checked, new icon buttons appear to help speed up your transcription.
Change to Math Translation
Whenever you need to designate that text should appear as Math, you can get to the Toggle Math Translation tool in multiple ways and easily make the changes.
To get to the Toggle Math Translation tool:
- Select the text you want to designate as Math.
- Go to Math > Toggle Math Translation; or use the keyboard shortcut Ctrl + M; or click the Math Translation button
 ; or right click and select Math from the context menu.
Your Math text appears highlighted bright pink in the Print view.
Add Nemeth Indicators
For Nemeth within UEB contexts, you need to insert Nemeth Indicators throughout your document, which you can add either blocked or inline depending on your needs.
- Select the text you want to appear between the Nemeth Indicators.
- Go to Math > Nemeth Block or Nemeth Inline, or click the Nemeth Block button
 or the Nemeth Line button
  .
.
The Nemeth Indicators now appear on the line before and the line after your Nemeth material if you chose Nemeth Block, or they appear before and after the Nemeth material only separated by a space if you chose Nemeth Inline.
Add Numeric Passages
For UEB Technical Material you may need to use a Numeric Passage in your document, which you can add either blocked or inline, depending on your needs.
To add numeric passages:
- Select the text you want to appear within the Numeric Passage.
- Go to Math > Numeric Passage Block or Numeric Passage Inline, or click the Numeric Block button
 or the Numeric Line button
  .
.
- Choosing Numeric Passage Block places the Numeric Passage on the line before and the line after your UEB Technical material.
- Choosing Numeric Passage Inline places the Numeric Passage before and after the UEB Technical material separated only by a space.
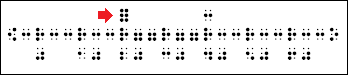
Add Numeric Spaces to a Series of Numbers
You can create a numeric series by using the Numeric Series tool as described:
- Highlight the text you want to be a numeric series.
- Go to Math > Numeric Series or click the Numeric Series button
 .
.
This action places dot 5’s where the spaces previously were. If there are two spaces, there are two Dot 5’s.
Get Math Help
You can also access the Math Help at any time. Go to Math > Math Help or click on the Math Help button  . This action opens a quick list of definitions for the Math tools and the button icons.
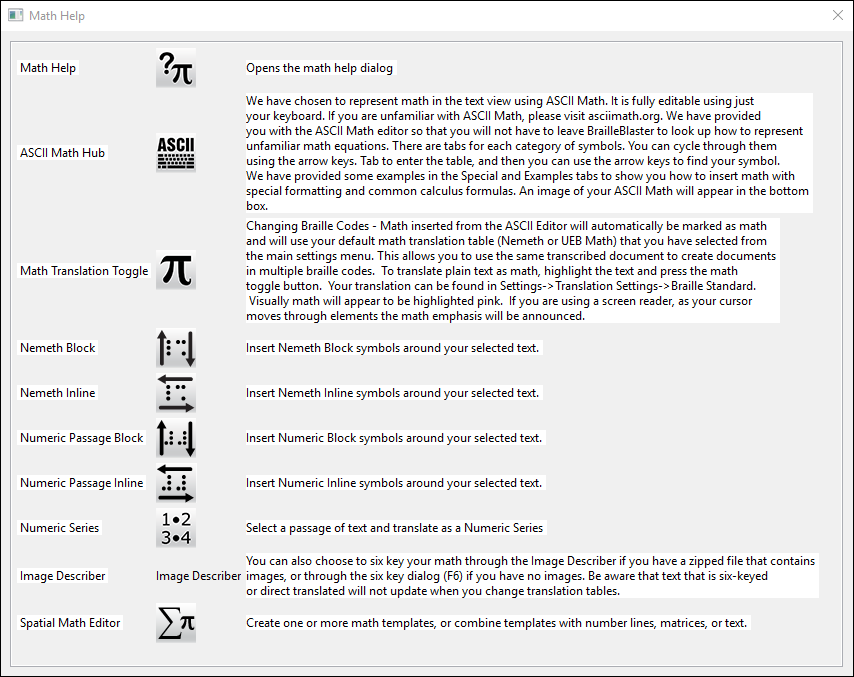
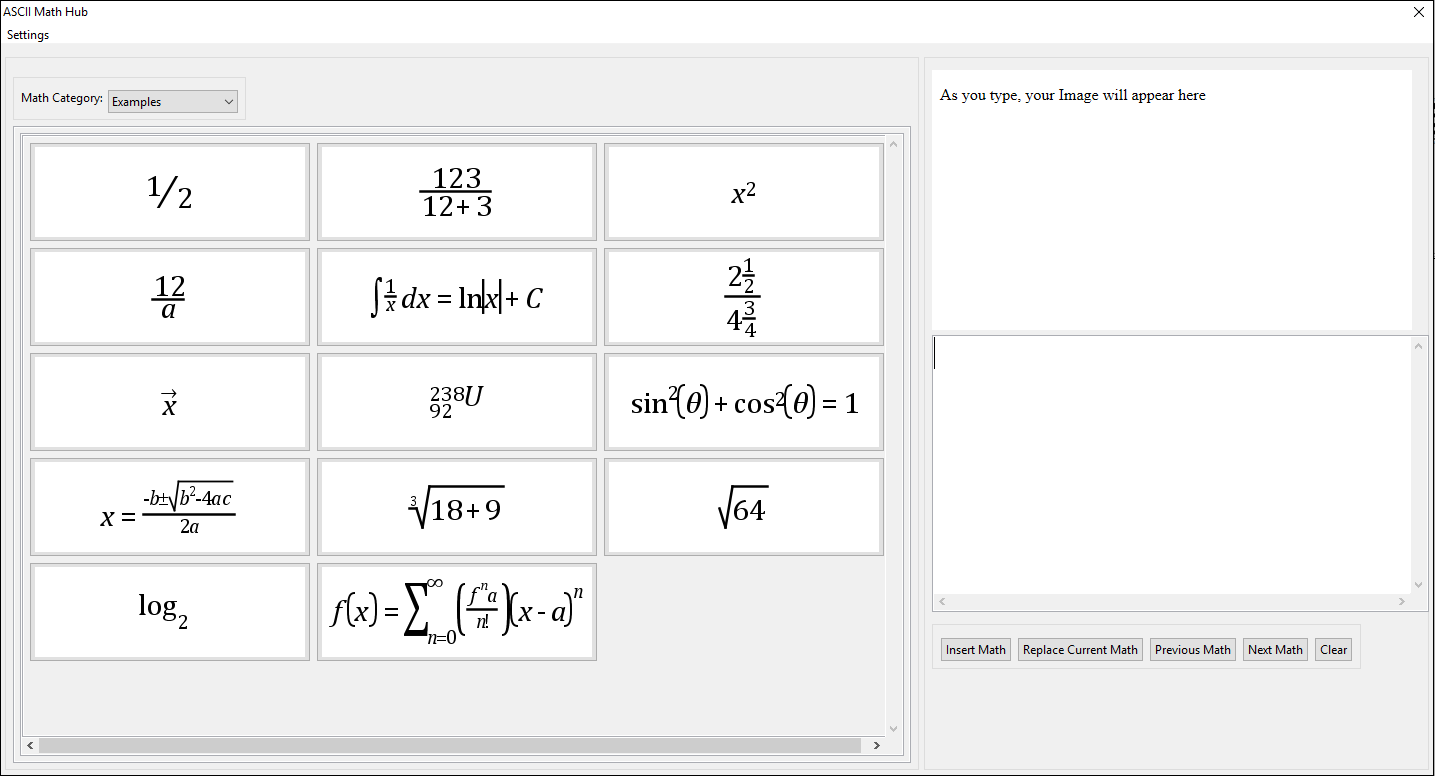
Making Linear Math
The ASCII Math Hub makes it easier to enter or edit unfamiliar math equations in a linear format.
To make a linear equation:
- Go to Math > ASCII Math Hub or click on the ASCII Math Hub button
 .
. - From here, you can select various types of equations and mathematic symbols, which are organized into tabs. You can show or hide these tabs by using the Show Tabs option in the ASCII Math Hub toolbar and selecting the tabs you want to view. The tabs include:
- Operation Symbols: A list of mathematical symbols used in an operation (e.g., division sign, multiply, union, etc.).
- Miscellaneous Symbols: A list of a variety of symbols frequently used in many types of mathematic notation (e.g., absolute value, angle, plus minus, etc.).
- Relation Symbols: A list of symbols that show the relationship between two parts of an equation (e.g., equals, greater than, proportional to, etc.).
- Greek Symbols: A list of Greek letters (e.g., alpha, beta, capital delta, etc.).
- Logical Symbols: A list of symbols commonly used in notations of logical expressions (e.g., true, there exists, if and only if, etc.).
- Grouping Symbols: A list of symbols used for grouping within mathematical equations (e.g., left and right braces, left and right brackets, left and right curly braces, etc.).
- Arrows: A list of arrows that can be use in mathematical equations (e.g., double left arrow, down arrow, double right left arrow, etc.).
- Accents: A list of accents that may appear in mathematical contexts (e.g., combining circumflex, dot x, double dot x, etc.).
- Functions: A list of function abbreviations used in mathematic equations (e.g., cosine, cotangent, cosecant, etc.).
- Special: Contains column vectors, complex subscripts, matrices, and script order templates.
- Examples: A list of common mathematic operations shown in ASCII Math and in an image for user convenience (e.g., complex fraction, exponent, overbar, etc.).
- Search: Here you can search for an ASCII Math symbol by typing it into the textbox and clicking OK.
- Select the Insert button to put your text in BrailleBlaster.
- (Optional step) Choose Replace Current Math to replace a previous entry of math that was made with your current entry. Select Previous Math or Next Math to navigate through the math elements in your document.
Note: You can also make the ASCII Math Hub full screen by choosing Full Screen in the Settings drop-down menu.
Note: Any math that you enter using the ASCII Math Hub is highlighted in bright pink in the Print View.
Making Spatial Math
To create or edit spatial math in BrailleBlaster, open the Spatial Math Editor.
Note: You cannot edit spatial math in the Print View. Instead, place your cursor in the spatial math you want to change, open the Spatial Math Editor, and make any changes needed.
Check out our Spatial Math in BrailleBlaster video!

To create spatial math:
- Go to Math > Spatial Math Editor or select the Spatial Math button
 .
. - Select the Container Type, or type of spatial math, you want to create in the menu. The options are:
- Number Line Editor
- Matrix
- Math Templates
- Regular Text
Set up Spatial Math
Some fields are available no matter what container type you have chosen. Container specific settings appear under the settings menu after you have selected that Container Type. There are general setting options and buttons to review before entering your spatial math.
Settings: These change based on your container type and translation. It allows for Nemeth Passage Indicators, Grade 1 Passage, or Numeric Passage Indicators to be applied inline for the translation it is set on.
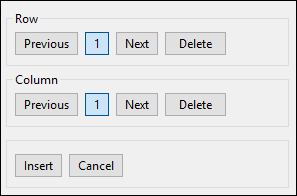
- Previous: Allows you move to the previous number in the list
- Next: Allows you to add more rows or move to the next row number in the list.
- Delete: Removes a row from list.
- Previous: Allows you move to the previous number in the list
- Next: Allows you to add more columns or move to the next column number in the list.
- Delete: Removes a column from list.
Insert: Places your new Spatial Math into your file where your cursor is placed or updates your previously created Spatial Math according to your edits.
Cancel: Closes the window without saving any changes.
H4. Editing Math Number Lines
Before you enter your Number Line information in the Spatial Editor, review the settings to ensure the best translation.
Settings Specific to Number Lines
- Reduce Fraction: Automatically reduces the fractions on your number line. If you want the same denominator to appear across the number line, do not use Reduce Fraction.
- Beveled Fraction: Sets the fraction lines in your number lines to a Beveled Fraction, which is a diagonal line in print. Beveled Fractions in UEB use the general fraction line; Nemeth uses the diagonal line.

- Add Arrows to Line: Puts arrows on the beginning and end of your number line.
- Stretch Across Page: Stretches the number line across the entire braille page. By default, BrailleBlaster tries to use the minimum number of cells to fit your number line on the page.
- Remove Leading Zeros: When your number line has decimals, Remove Leading Zeros omits the zeros that appear before the decimal. For example, 0.5 appears as .5 in braille.
- Number Line View: Sets whether your number line appears as math or plain text:
- Math Entry: Allows a sequential number line to be put in according to your needs.
- User Text: Allows you to enter text instead of math for the labeled tick marks on the number line. This adds the option Line Marker, which allows up to 10 markers along the number line.
- Interval/Points: Creates either Points along the number line or an Interval along a segment of the number line.
- Points: Creates points along the number line
- Interval: Creates a line segment on the number line
- None: Removes any Intervals or Points from the number line
- Start Interval Type: Inserts a symbol at the start of your line segment. Your options are:
- Empty Circle:

- Full Circle:
- None:
- Empty Circle:
- End Interval Type: Creates a symbol at the end of your line segment. Your options are:
- Empty Circle:
- Full Circle:
- None:
- Empty Circle:
Create a Number Line
BrailleBlaster calculates your number line automatically as long as the fields are filled in using numbers that make sense mathematically:
- Count By: The amount you want each number on the number line to increase by.
- Line Start: The first number of your number line.
- Line End: The last number of your number line.
- Interval Start: The first number of your line segment.
- Interval End: The last number of your line segment.
Once you have filled out these fields, select Insert and the math is put into your file at the location of the cursor.
Editing Matrices
Before you enter your Matrix information in the Spatial Editor, review the settings to ensure the best translation.
Settings Specific to Matrices
- Translation: Allows you to choose the type of Translation for your Matrix:
- Uncontracted
- Direct
- ASCII Math
- Literary
- Add Ellipsis to Blank Cells: Automatically adds ellipses to blank spaces in your Matrix.
- Grouping Device: Allows you to change which grouping indicator encloses your Matrix cells. The options include:
- Bracket
- Parentheses
- Brace
- Vertical Bar
- Big Bracket
- Big Parentheses
- Big Brace
- Big Vertical Bar
- Wide Overflow Style: Automatically used when you enter large amounts of text in the Matrix cells or there are many Matrix cells. BrailleBlaster detects when a Matrix is too large to fit on one braille page and formats your text based on your overflow style and how you set up your document in Page Properties. You have two overflow options:
- Block and Blank Line: Makes each cell of the Matrix into a block with the overflow of text appearing vertically in the block
- Indent Columns: Formats each of the Matrix columns into a block and indents each column by two braille cells.
Note: If you have the Indent Columns option selected, but only one cell is too long for a braille page, BrailleBlaster overrides this with Block and Blank Line formatting in order to fit the Matrix on the page.
- Row & Column: Customizes the number of rows and columns for each Matrix, up to 9 for each.
Using Math Templates
With Math Templates you can add Identifiers, Operators, and Operands to your equations and customize them to fit your needs.
Settings Specific to Math Templates
Before you enter your Math Template information in the Spatial Editor, review the settings to ensure the best translation.
- Template Type: Changing your template type changes the layout of the boxes where you enter your text. The three template types are:
- Simple Template
- Fraction Template
- Division Template
- Operator: Allows you change the operation sign you want to use in your equation. You can also change your operator from the drop-down menu of the text area.
- Plus
- Minus
- Multiply
- Operands: Customizes the number of operands in your equation, up to 20.
- Solution: Allows you to enter the solution for the equation to your template.
- False: No solution is shown
- True: You can enter the solution, which is shown
Making Grids with Regular Text
You can make a grid out of any text and can customize the position of that grid.
Settings for Regular Text
Before you enter your grid information in the Spatial Editor, review the settings to ensure the best translation.
Vertical Alignment: Aligns your grid entries vertically with options:- Top
- Center
- Bottom
- Right
- Center
- Left
- Trim
Working with Smart Volumes
The Volume Manager tool is a "smart" volumes feature that allows you to set where volume breaks occur in the document, control what kinds of volumes they are, and insert T-Pages, Table of Contents, and End of Volume statements.
Inserting Volumes
Selecting Tools > Volume Manager > Insert inserts a volume break into the document, either Normal, Preliminary, or Supplemental. The cursor must be placed in the document at the point where the break is to occur.
- The volume break is inserted directly before the cursor.
- If the volume break is desired after a particular element, place your cursor at the beginning of the element that follows; this inserts the volume break between the two elements.
- Everything before the cursor is defined as one volume and everything after is defined as a separate volume.
The ideal cursor location for a volume break is on a print page indicator, as this inserts the volume break before the indicator.
If no print page indicator exists because the print page starts at the beginning of a braille page, put your cursor at the beginning of the first element on that braille page; this inserts the volume break on the previous braille page.
There are three different types of volumes that can be inserted. The main difference between them is the End of Volume statement. Each agency has different rules about different types of volumes. Refer to your agency's guidelines for the appropriate use.
- Preliminary: End of Preliminary Volume [number]
- Normal: End of Volume [number]
- Supplementary: End of Supplementary Volume [number]
Using the Change Volume Type tool, you can change the selected volume's type from one type to another. This action affects the End of Volume statement for that volume. The cursor must be placed somewhere in the volume you wish to change.
The Delete Current Volume command allows you to delete the volume break for the currently selected volume (e.g. the volume in which the cursor is located). This command only functions if a volume break has already been inserted into the document.
In addition to defining the text as belonging to specific volumes, inserting a volume break also adds the End of Volume statement and improves the use of additional tools, including the T-Page Generator, TOC Builder, and saving individual volumes BRFs.
Making the Most of Smart Volumes
When a volume is inserted in BrailleBlaster, several actions happen at once. Not only is text inserted to indicate the end of the volume, but portions of text within the file are actually defined as the volume. Defining the text in this way allows several tools—T-Page Generator, TOC Builder, and BRF saving—to work more efficiently. For this reason, it is best to use these tools after volumes have already been defined.
Add T-Pages to Volumes
Note: It is best to wait to use the T-Page Generator after completing the transcription of the entire document—including adding Volume Breaks—if your document is being split into more than one volume. This is because BrailleBlaster uses Volume Breaks to insert the T-pages into their correct location in a document.
Within the T-Page Generator, the Volume Navigation buttons (Previous Volume/Next Volume) allow you move through each volumes’ T-Pages, if your document has more than one volume. You can make specific changes to each volume using these navigation buttons. You can also use Copy Current Volume to copy the current volume’s T-pages to all volumes of the document.
See Generating T-Pages for complete details.
Add Volume Divisions to the Table of Contents
The TOC Builder is capable of dividing the TOC between Volumes. It does this using the Volume Break, Volume Split, and Disperse to Volumes tools to create the necessary divisions in the TOC.
Note: All volume divisions using Volume Break in the text should have already been made before beginning these steps.
- Click the Volume Split button in the TOC toolbar to insert the text “TOC Volume Split Placeholder” where the volume divisions are in the TOC.
- Select the Disperse to Volumes button.
Note: If Disperse to Volumes is pressed before volumes are created, a warning message appears alerting you to create volumes first.
Now the “TOC Volume Split Placeholder” text has been changed to the appropriate Volume number (e.g., Volume 1), and each subsequent volume only contains the TOC entries and headings that are present in that particular volume, according to Braille Formats, 2016.
See Building the Table of Contents (TOC Builder) for complete details.
Navigate Within Volumes
After adding volume breaks, you can use Go To Page to navigate to a specific braille page. See Go To Page for complete details.
Working with Tactile Graphics
Creating Blank Space for a Tactile Graphic
The Image Placeholder allows you to insert blank lines to leave the required amount of space for a graphic within the text.
- Place your cursor where you want to insert the blank lines.
Note: The blank lines will be inserted into the document before the cursor.
- Go to Insert > Image Placeholder. This action will bring up a window.
- In the window, a textbox is shown with the label: Number of lines (
- Once you have typed the number you need, select Submit to add in the lines or Cancel to go back to the document without making any changes.
See also the sections on Creating Facing Pages and Adding Blank Pages, as these are important for adding tactile graphics to interpoint documents.
Attaching Images to Image Placeholders
Blank lines can be associated with an image now.
Go to Insert > Image Placeholder and insert the number of blank lines in the dialog box to account for the graphic.
Use the Insert Image Location button to choose a file from your computer to associate with that set of blank lines. When the association is made, the braille and graphics can be embossed together to a supported embosser. Currently, only ViewPlus graphics embossers are supported; however, more are planned for the future.
Other Editing Tools and Features
Formatting Styles
Styles are an integral part of the transcription process. Giving text elements different styles distinguishes how the print is formatted, providing clarity for the braille reader.
Viewing Applied Styles
By using Breadcrumbs and the Style View you can see what kinds of styles are applied to the text and how the text is grouped.
Viewing Style Containers
Breadcrumbs is a feature that shows what styles are applied to sections of the text. Like a trail of breadcrumbs, it shows every style used leading up to that specific piece of text.
- Go to View > Toggle Views > Breadcrumbs. This makes Breadcrumbs visible in the bottom section of the toolbar.
- Breadcrumbs shows different levels of styles that have been applied to a piece of text. Clicking on one of the section buttons highlights everything within that style level.
Viewing Styles in the Main Window
Within the default Settings, the Style View for BrailleBlaster is located at the left-most section of the document view. This view shows what style has been applied to the selection of text in the Print View. This is helpful for viewing types of formatting in the document. You can change where this view is located on the screen, as well as turn it on and off. See Toggle Views for details.
Applying Styles
BrailleBlaster's formatting is contextual, and the Styles conform to the rules laid out in Braille Formats 2016. How each style functions in BrailleBlaster is detailed in the Style Appendix.
To apply a style:
- Place your cursor in an element OR highlight a section of text where you want to apply a style.
- Go to Styles and select the style you want the element to have OR select the desired style from the toolbar buttons.
- Once selected, that style is applied to the text.
Repeating the Last Used Style
The Repeat Last Style tool is used to continuously apply the last used style to new text elements.
To repeat the last style:
- Place your cursor in an element OR highlight a section of text where you want to apply a style.
- Go to Styles > Repeat Last Style or use the keyboard shortcut (Ctrl + R).
- The style last applied to the previous element is now applied to the current element.
Note: If no style has been applied, and this feature is used, a pop-up opens letting you know there is no style to repeat.
Removing a Style
In BrailleBlaster, you can replace any style with another style from the Style toolbar, but there is a tool that allows you to remove certain styles from a text element in one simple step. Unwrap Element allows you to remove certain styles, including List, Poetic Stanza, Box, Full Box, and Prose.
To remove a style:
- Have Breadcrumbs displayed in the toolbar. See Viewing Applied Styles for instructions on how this done.
- Place your cursor on the text you want to Unwrap.
- Select the container button for the element in Breadcrumbs. The text is now highlighted.
- Go to Tools > Unwrap Element.
Note: In some cases, Unwrap Element may be grayed out or unavailable to select. If this occurs, you must apply another style instead of using this tool.
- After selecting Unwrap Element, the text is formatted as Body Text, the default style in BrailleBlaster, which presents text as indented paragraphs with margins of 3-1.
Adjusting the Number of Style Levels:
You can adjust the number of Style Levels that appear for each style with multiple levels. The default number of levels displayed is five, but you might find you need fewer or more levels. BrailleBlaster can show up to eight.
To adjust the number of styles:
- Go to Styles > Configure > Style Levels.
- Select the number of levels that you wish to view in the dropdown menus in the Styles toolbar.
Configuring Style Loadouts
Style Loadouts are designed to make the transcription process faster since there are not enough keys on the keyboard to make a shortcut key for every style. A loadout refers to either a section of styles or subsection of styles.
Note: Please refer to the Appendix B: Shortcut Key Combinations for a complete list of all loadouts and their shortcut key combinations.
- Go to Styles > Configure > Loadouts and select which style type you want for the loadout.
- If the style type that you have selected has a nested format, like a list or exercise materials, a window opens asking how many levels of nesting you want your loadout to contain.
Note: If the style you select is not in a nested format, the shortcut keys will be set in the order that the style types appear in the dropdown menu, or the Styles toolbar.
- Click OK when you have selected the number of nesting levels, or Cancel to return to your document.
The loadouts are then assigned to the Alt key plus a number. 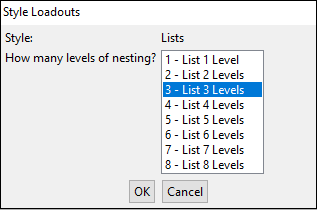
Example: Choosing “3 - List 3 Levels” sets all of the list styles in that subsection to L1-7 as Alt + 1, L3-7 as Alt + 2, and L5-7 as Alt + 3. Use these shortcut keys to make changing Style Levels easier.
Note: Be sure to use the number keys on your main keyboard and not the number keys on the numeric pad.
Using Style Options
Sometimes it is necessary for a braille document to have additional style rules on certain parts of the text. Style Options allows you to add various style rules to the text.
Setting Your Own Margin
There are times when you have text that doesn’t conform to BrailleBlaster’s existing style options. There are many oddities when formatting braille and they can’t all be covered by a predetermined style. For these situations, you can use Set Cell Position, which allows you to set the indentation for the line of text at the cursor’s position.
To set your own margin:
- Place your cursor before the element you wish to indent.
- Go to Edit > Set Cell Position, which causes a textbox to open.
- Type the cell number where you want your text to start into the textbox.
- Click OK. The text element is pushed over into the cell number you entered.
Note: If you type in a number lower than the cell the text is currently on, it drops down to the next line and begins on that cell. This command does not work if the cursor is at the end of a line. It is only applied to one line at a time.
Keeping Text on the Same Line
Hitting Enter moves the text down to the next line, but it treats it is as a new element, like a new paragraph in Body Text or a new item in a List. When you don’t want a new element, but need text to stay together, you can insert a Line Break. This inserts a break at the location of the cursor, dropping all text following the cursor down to the next braille line.
To keep text on the same line:
- Place your cursor where you want your line break to be.
- Go to Edit > Line Break OR use the keyboard shortcut (Shift + Enter).
- The text moves down to the next line and starts at the appropriate runover.
Note: The text starts in the runover cell determined by the current element's style. For instance, if the style is Body Text (which has 3-1 margins), inserting a line break starts the new line on cell 1.
Keeping Text on the Same Page
Don’t Split is the only style option that wraps elements of different styles. It is used to keep the selected elements together on the same braille page.
To keep text on the same page:
- Highlight the elements that need to be kept together.
- Go to Styles > Options > Don’t Split and apply the style option.
Note: If the selected elements do not fit on a single braille page, any text longer than one braille page continues on to the next braille page.
Keep With Next
Selecting Keep With Next causes that element to stay with whichever element follows it.
To keep an element with the next one:
- Select the desired element by highlighting it.
- Go to Styles > Options > Keep With Next and apply the style option.
Note: If the second element moves to a new braille page because of changes to formatting, the element that has the Keep With Next style applied also moves to that braille page.
Adding Blank Lines
The style options Lines Before and Lines After allow you to set the number of blank lines either before or after. Every style that begins on a new line automatically has a value of 1 for Lines Before and Lines After. If you want that element to have a blank line before or after it, set the value as 2. Some styles already have blank lines by default, such as Centered Headings, which have a value of 2 for Lines Before and a value of 2 for Lines After. To add an extra blank line before a Centered Heading, set the Lines Before value as 3.
To add blank lines:
- Select the desired element(s) by highlight it.
- Go to Styles > Options.
- Click on the Lines Before or Lines After style option.
- In the window, enter the value (number of lines) in the textbox.
Adding Double Lines
The style option Double Spaced allows you to apply double-line spacing to highlighted text.
To apply double-line spacing:
- Highlight the desired elements to select.
- Go to Styles > Options > Double Spaced and apply the style option.
Removing Text From Lines with Page Numbers
The style option Skip Number Lines determines whether the element should skip lines that contain page numbers.
To remove text from lines with page numbers:
- Go to Styles > Options > Skip Number Lines.
- Choose one of the following options:
- Top: Prevents the element from appearing on the top line of the braille page
- Bottom: Prevents the element from appearing on the bottom line of the braille page
- Both: Causes the element to skip both the top and bottom lines of the braille page
- None: Removes other Skip Number Line options if they are no longer needed
Once the style has been selected, it is immediately applied.
Note: Keep in mind that even if None is selected, when you have a Running Head or Guide Words, those lines are automatically skipped because they are applied to those elements.
Creating Facing Pages
Page Side is used to set which side of a page certain text needs to be on within interpoint documents. This is useful when you have graphics or material that needs to appear on facing pages, such as tables or question and answer choices. When formatting decisions cause an element to move, the selected material continues to appear on the type of page selected. If the page side isn’t significant, and you just need a blank page added, see Adding Blank Pages.
To create facing pages:
- Go to Styles > Options > Page Side.
- There are two options to choose from: left or right.
- Page Side Left: Applying this to an element causes that element to appear only on the left-hand side, which is an even page.
- Page Side Right: Applying this causes that element to appear only on the right-hand side, which is an odd page.
- If the text is on the type of page you have selected, it remains on that page; but if it is not, it moves to the type of page you selected.
Adding Blank Pages
The style options New Pages Before and New Pages After are used to insert a blank braille page before or after the selected element. This ensures that formatting decisions made before this point in the document do not remove a blank page that the transcriber deems necessary. If the blank page is needed in order for material to appear on facing pages, see Creating Facing Pages, as that style option ensures your material stays facing.
To add a blank page:
- Go to Styles > Options.
- Click on the New Pages Before or New Pages After style option.
A blank page is created either before or after the element you highlighted.
Working with Page Numbers
BrailleBlaster has many tools for numbering braille and print pages efficiently.
Adding Page Numbers
Adding Print Page Numbers
If Print page numbers have not automatically been added to your document, you can add them manually by using the Page tool.
To add print pages:
- Type the print page number into your document where a print page break should occur.
- Highlight that number and go to Styles > Miscellaneous > Page or use the
 button on the Styles toolbar.
If the number is in the middle of a braille page, a print page change indicator appears across the page with the print page number at the right margin.
Adding a Page Change Indicator with No Print Page Number
You may encounter material or sections with no print page numbers. If the print page breaks are still relevant, you can manually add a blank page change indicator that has no print page number.
To add a page change indicator:
- Place your cursor before the location where you want the page change indicator to appear.
- Select Insert > Blank Print Page Indicator.
Adding Braille Page Numbers
Braille page numbers are added automatically with BrailleBlaster. You can also add more braille pages (if needed) by using Page Break.
Note: There must be text present after the cursor to use Page Break.
To add braille page numbers:
- Place your cursor where you want the Page Break to appear.
- Go to Edit > Page Break OR use the keyboard shortcut (Ctrl + Enter).
The break is inserted after the cursor, forcing all text after the cursor to the next braille page. You can continue to use this feature to create more braille pages as needed.
Editing Page Numbers
BrailleBlaster makes editing page numbers easy with the Edit Page Number tool. This tool can be used to change print and braille page numbers as needed.
To edit a page number:
- Put your cursor anywhere on the page that you wish to change.
- Go to Edit > Edit Page Number or right-click and select Edit Page Number from the context menu. This action opens the Page Number Dialog window.
The Page Number Dialog gives you several options to change both your print and braille pages.
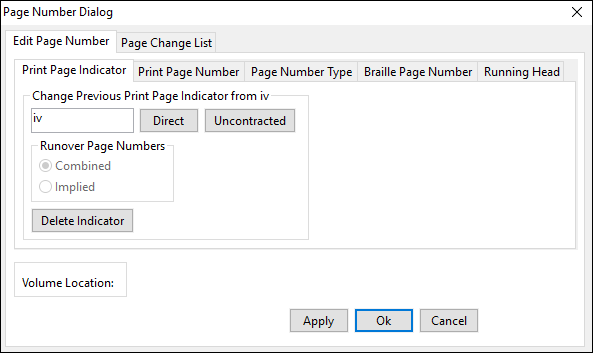
Changing Print Page Indicators
Note: This option only appears if a Print Page Number is already present on the page selected.
To change a print page indicator:
- In the Page Number Dialog window, go to Edit Page Number tab > Print Page Indicator tab.
- Find the “Change Previous Print Page Indicator from [X]” section.
- Change the number in the textbox (which displays the current print page number) to the desired number. The page number can be presented in Direct or Uncontracted braille. You can also have a print page number that is a combination of two print page numbers separated by a hyphen. This changes the first page number and all continuation pages.
- If you have NOT inserted a hyphen into the Change Previous Print Page Indicator textbox, you can select Ok to save your changes or Cancel to leave without saving and skip steps 5 and 6.
- If you HAVE inserted a hyphen into the Change Previous Print Page Indicator textbox, the Runover Page Numbers options become available.
- Combined: This option causes the print page runovers to appear as hyphenated numbers.
- Implied: This option causes the print page runovers to be displayed containing only the second print page number.
Note: The options for Runover Page Numbers are based on rules for print page numbers found in Braille Formats, 2016 Section 1.11.
- After you have selected the Runover Page Number option that is appropriate for your document, select Ok to save your changes or Cancel to leave without saving.
Changing Print Page Numbers
To change a print page number:
- In the Page Number Dialog window, go to Edit Page Number tab > Print Page Number tab.
- Find the “Change Print Page Number from [X]” section.
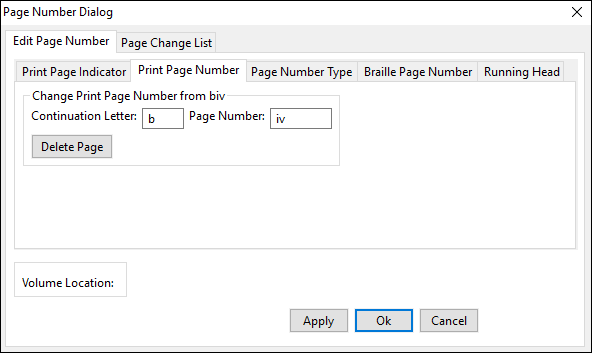
- Enter the appropriate changes into one or both of the textbox fields. *Note:* All numbers must be entered in ASCII. There are two textbox fields to fill in: ** Continuation Letter: You can use this textbox to change the Continuation Letter from what is shown (i.e., b) to whatever letter is needed (i.e., c). All page numbers runovers that follow automatically update accordingly. This is useful if your agency has special requirements for numbering blank pages. ** Page Number: Only changes that instance of the print page number, without changing the surrounding page numbers.
- Select Ok to save your changes or Cancel to leave without saving.
Changing Braille Page Numbers
To change braille page numbers:
- In the Page Number Dialog window, go to Edit Page Number tab > Braille Page Number tab.
- Find the “Change Braille Page Number from [X]” section.
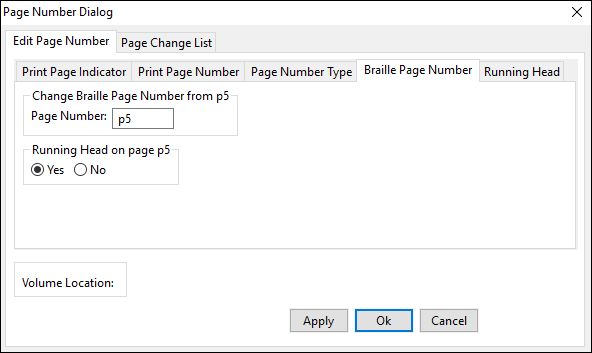
- Enter the appropriate braille page number for the current page.
- Choose Yes for that page to have a [[#Setting a Running Head|Running Head]], or No if not.
Sometimes you may need to change the type of braille page number you want for your document.
To change the type of braille page number:
- In the Page Number Dialog window, go to Edit Page Number tab > Page Number Type tab.
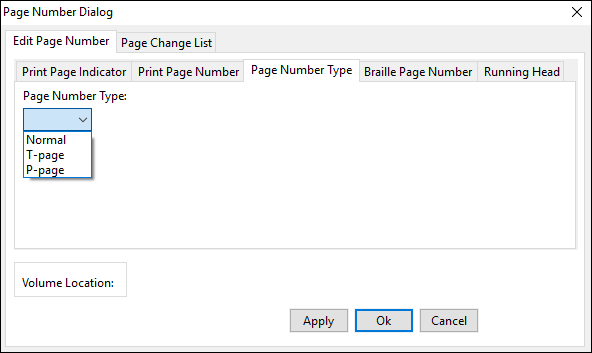
- Select one of three options from the drop-down menu: ** Normal: The braille page number shows the ordinal number. ** T-page: The braille page number starts with the letter “t” for transcriber-generated pages. ** P-page: The braille page number starts with the letter “p” for preliminary pages.
Note: Once you change the braille page type, the braille page numbers continue to appear as that type until a new braille page number type is selected.
- Select Ok to save your changes or Cancel to leave without saving.
Deleting Page Numbers
Deleting Print Page Numbers
There are two options for deleting print page numbers. You can delete the print page indicator or the print page.
To delete a print page indicator:
- In the Page Number Dialog window, go to Edit Page Number tab > Print Page Indicator tab.
- Select the Delete Indicator button to delete the print page number and all continuation indicators with that print page number. The pages remain in your document following the page change indicator, but without print page numbers. All other print page numbers remain the same.
- Select Ok to save your changes or Cancel to leave without saving.
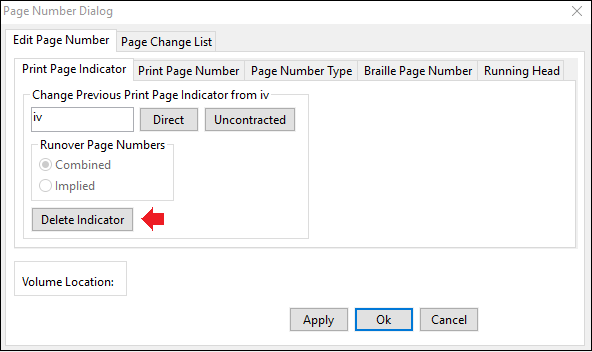
To delete a print page:
- In the Page Number Dialog window, go to Edit Page Number tab > Print Page Number tab.
- Select the Delete Page button to delete the specific print page number and continuation letter currently in the textboxes. The print page number is removed from the current braille page and is applied on the next braille page.
Example: If you delete print page c5, the current c5 no longer has a print page number, and the next page, d5, becomes print page c5.
- Select Ok to save your changes or Cancel to leave without saving.
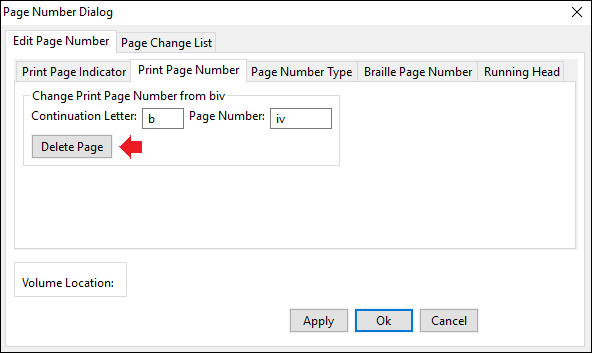
Note: You can also move or remove Print Page Numbers by going to Settings > Page Numbers. The default location is the top right for both Even Print Page Number and Odd Print Page Number, but you can change each of these depending on what your agency requires. You can move them to the top left, bottom left, or bottom right of the page, or have none.

Deleting Braille Page Numbers
To delete a Braille page number, first delete the text or blank space on that page. If you want to move or remove your braille page numbers, go to Settings > Page Numbers to choose how you want your Braille page numbers to appear in your document. The default is the bottom right for both Even Braille Page Number and Odd Braille Page Number, but for each type you can move them to the bottom left, top right, or top left of the page, or have none.
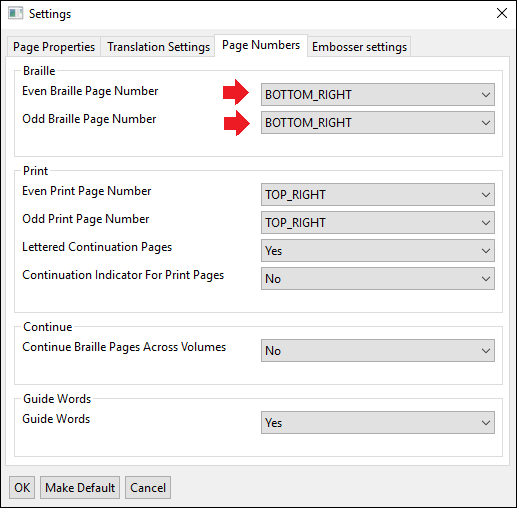
Viewing Page Number Changes
Within the Page Number Dialog window, there is a Page Change List tab that lists all the changes you have made to the print and braille page numbers. You can delete your changes by checking the checkbox next to the corresponding change and then clicking the Delete button at the bottom of the window. You can navigate to the changed pages by clicking the Go To button to the right of the list item.
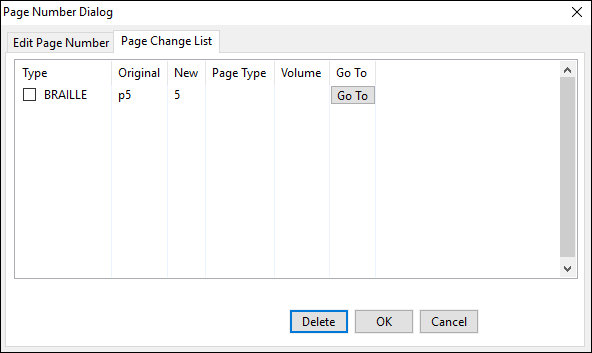
Working with Emphasis
There are many forms of Emphasis in braille that allow the text to be prominent. Also known as font attributes or typeforms, these range from common forms of print emphasis to those unique to braille. Each type of emphasis is explained in Section 9 of the Rules of Unified English Braille, and when to use or ignore font attributes is detailed in Braille Formats, 2016, Section 5: Typeforms.
Adding Emphasis
In BrailleBlaster, emphasis can only be applied to text that has already been created. Highlight a selection of text and add the desired emphasis using the appropriate keyboard shortcut or toolbar button, or go to the Emphasis menu.
- Bold (Ctrl + B): Adds Bold to a symbol, word, or passage.
- Italics (Ctrl + I): Adds Italics to a symbol, word, or passage.
- Underline (Ctrl + U): Adds an Underline to a symbol, word, or passage.
- Script (Shift + Alt + S): Add Script indicators to a symbol, word, or passage that mimics handwriting in print. The selected text appears light pink in the print view.
- Transcriber Note Symbols: Although Transcriber’s Note (TN) indicators are not a print typeform, they add a special emphasis for the braille reader. TN indicators are added at the beginning and end of the selected text. Adding this emphasis across three elements, for example, puts an opening TN indicator at the beginning of the first element and a closing TN indicator at the end of the last element.
- Transcriber-Defined Typeforms: There are some types of emphasis in print with no braille equivalent such as highlighting, colored font, or double underlining. Transcriber-Defined Typeforms allow this emphasis to be represented with a braille symbol that is defined on the Transcriber’s Notes Page of the document. These indicators and how to use them are described in Section 9.5 of the Rules of Unified English Braille.
- Transcriber-Defined 1 (Shift + Alt + 1)
- Transcriber-Defined 2 (Shift + Alt + 2)
- Transcriber-Defined 3 (Shift + Alt + 3)
- Transcriber-Defined 4 (Shift + Alt + 4)
- Transcriber-Defined 5 (Shift + Alt + 5)
Removing Emphasis
Emphasis can be removed by highlighting the text that is emphasized and selecting the same emphasis option that is currently applied to it. BrailleBlaster also has tools to make the removal of emphasis easier from larger pieces of text with more than one applied emphasis style.
Removing Emphasis from a Selection
This feature removes all emphasis from a highlighted selection. This works for whatever amount of text is selected: a few words, a few paragraphs, or several pages of text.
- Highlight any amount of text with emphasis you want removed in your file.
- Go to Emphasis > Remove Emphasis from Section or use the keyboard shortcut (Ctrl + Shift + R)
The highlighted text is no longer emphasized.
Removing All Emphasis from Headings
Headings do not usually need to be emphasized in braille. You can manually remove emphasis for each heading, or a use tool to remove emphasis from all headings in one action.
Note: It is advisable to save your work before using this feature.
Go to Emphasis > Remove All Emphasis from Headings.
Note: You have to add emphasis manually to headings where it should be kept after using this tool.
Removing All Emphasis from List Prefixes
In print documents, the numbers or letters at the beginning of list items can appear in bold. This Emphasis is usually considered unnecessary in braille and is typically removed. BrailleBlaster can search the file and remove the emphasis from numbers and letters at the beginning of lists.
Note: It is advisable to save your work before using this feature.
Go to Emphasis > Remove All Emphasis from List Prefixes.
Note: You have to add emphasis manually to any list prefixes that require it after using this tool.
Removing All Emphasis from Alphabetic Reference Entry Words
Print often adds emphasis to the entries in indexes and glossaries, but Braille Formats, 2016 says to ignore such font attributes unless they are needed for distinction, such as foreign words or book titles. BrailleBlaster allows you to remove the emphasis from all of the entry words in those sections designated as a glossary or index in one action.
Note: It is advisable to save your work before using this feature.
Go to Emphasis > Remove Emphasis from Alphabetic Reference Entry Words.
Note: You have to add emphasis manually to any entry words that require it after using this tool.
Modifying the Braille Translation
BrailleBlaster works with a program called LibLouis to give transcribers the most accurate translation possible, but sometimes the translation is inaccurate and needs be changed. BrailleBlaster has several tools for correcting braille text in your current document and applying it to future documents.
Spell Checking a Document
Spell Check searches for misspelled words in the Print View.
To check spelling:
- Go to Tools > Spell Check OR use the keyboard shortcut (F7).
Spell Check automatically begins checking your file from the beginning and lists suggestions for potentially misspelled throughout your document in the Spell Check window.
- Select one of the words the program gives you OR edit the word in the textbox.
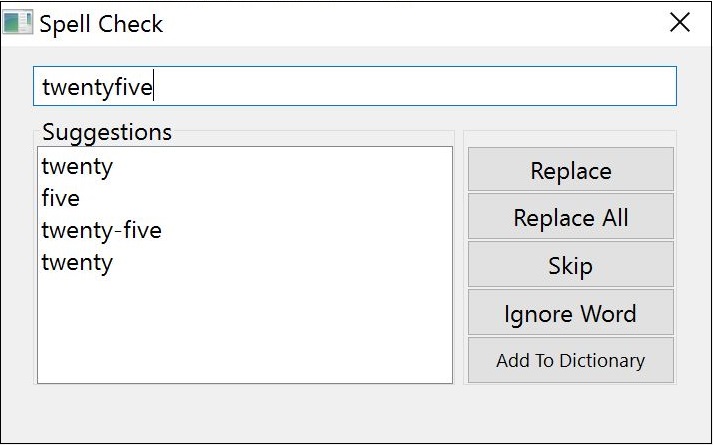
- Select on of the options for making changes to the word in your document: ** Replace: Replaces the selected instance of the word with your corrected text. ** Replace All: Replaces all instances of the word within the document. ** Skip: Skips over that instance of misspelling. ** Ignore Word: Ignores future instances of that misspelling in the document. ** Add to Dictionary: Adds the word to the dictionary so that it is no longer considered a spelling error.
Once you select an option, it is applied to the highlighted text, and Spell Check moves on to the next instance.
- When BrailleBlaster reaches the end of your file, an Alert opens informing you “Spell Checking Complete.”
Entering Braille Directly into a Document
Six Key Input allows Six Key transcription within BrailleBlaster. This tool opens a separate window where you can type braille directly by pressing combinations of the keyboard keys FDS and JKL to create the six dots of a braille cell.
Note: If you find this feature doesn’t work for you, it is most likely your keyboard. Not all keyboards allow more than one letter to be pressed at a time.
To use six key entry:
- Go to Tools > Six Key Input or use the keyboard shortcut (F6).
- Use the keyboard keys FDS and JKL as the six dots of braille to enter text into the window.
| Letter | Dot Number |
|---|---|
| F | 1 |
| D | 2 |
| S | 3 |
| J | 4 |
| K | 5 |
| L | 6 |
- Choose one of two options to put the text into the document:
- Insert Inline: Inserts the text wherever your cursor is located and applies the format of the text element.
- Insert as Block: Makes the entered braille appear as its own text element automatically formatted as Body Text.
In the Print View, the text is highlighted in purple and Direct translated into ASCII. In the Braille View, the text appears just as it did in the Six Key Input window.
Changing the Text Translation
Even after you’ve designated your translation settings, you can change how part of the text is translated, ranging from a word to multiple pages. Change Translation offers two translation options for a selection of text: Uncontracted and Direct.
To change text translation:
- Highlight the section of text to change.
- Go to Tools > Change Translation OR use the Change Translation toolbar button
 OR right-click and Select Change Translation.
 - Select the appropriate translation for your document:
- Uncontracted (Ctrl + Shift + T): Presents the selected text in grade 1 braille, without the use of contractions. The text is highlighted in green in the braille view.
- Direct (Ctrl + D): Presents the literal ASCII translation of the selected text. The text is highlighted in purple in the print view.
Note: Direct translation is sometimes necessary when you need to force the translation to appear a certain way, but BrailleBlaster does not allow it otherwise.
Correcting the Braille Translation
Correct Braille Translation allows you to submit translation corrections for the program LibLouis. This ensures quick and easy recognition of undefined print characters. The most common corrections are for Unicode characters (i.e., Unicode: U + 25B6 for a black right-pointing triangle), proper nouns, and non-English words, though you may find a translation mistake on occasion.
When you encounter an undefined Unicode character in the translation, the Unicode image appears in the Print View, while the Unicode name, enclosed in Transcriber’s Notes, appears in the Braille View.

Making a Braille Translation Correction
To make a braille translation correction:
- In the Print View, highlight the character or word that is not translating correctly.
- Go to Tools > Correct Braille Translation OR use the keyboard shortcut (Ctrl + T). In the Correct Translation window the highlighted print word is shown in the Print textbox. There is also a Braille textbox for entering the correct translation of the character or word.
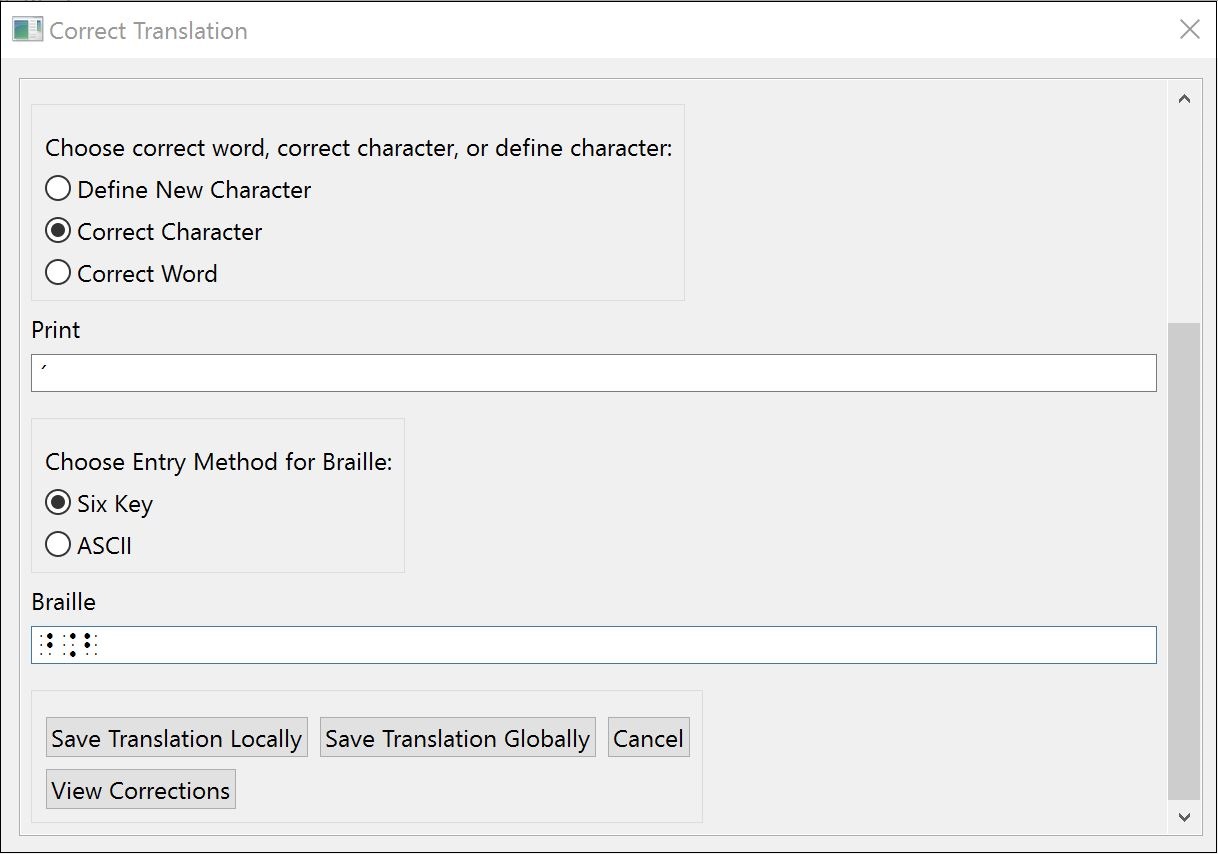
- Choose one of three options appropriate to the correction of the text:
- Define New Character: Creates a new character.
- Correct Character: Corrects an improperly translated character.
- Correct Word: Corrects a proper noun or foreign word.
- Select your entry method for typing the correct braille: Six Key or ASCII.
- Type the corrected braille into the Braille textbox.
- Select one of two options for saving your translation correction or Cancel to leave without making changes:
- Save Translation Locally: Allows you to save to a locally designated file on your computer. This option is for personal translation options.
- Save Translation Globally: Saves to a local file on your computer and submits the correction to APH. APH reviews the change for future BrailleBlaster releases and to share with others who use LibLouis. This process of continuous improvement to the translation tables helps braille readers around the world receive timely, accurate braille.
Viewing Past Braille Translation Corrections
To view past braille translation corrections:
- Select the View Corrections button at the bottom of the Correct Translation window. This action opens another window where your corrections to translations can be viewed.
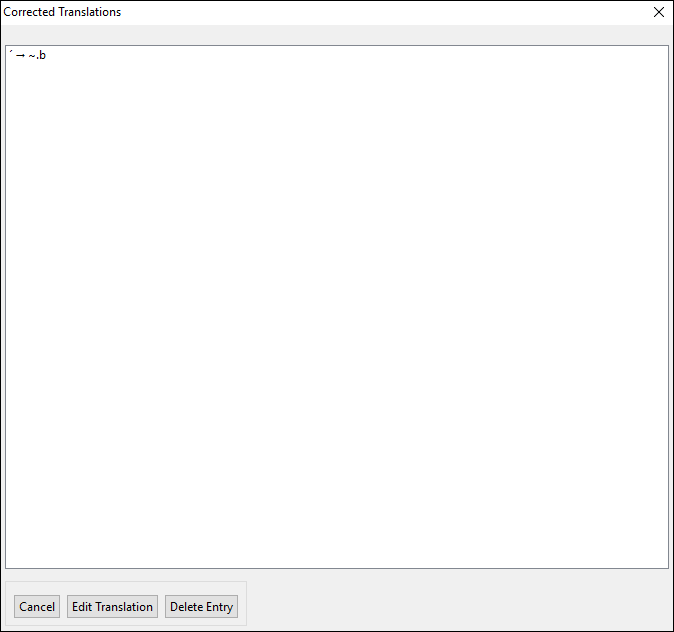
- Select the Edit Translation button to make edits to translations you have previously entered OR select a translation from the list and click the Delete Entry button to delete translations that are no longer needed.
- Select Cancel to return to the Correct Braille Translation window without making any changes.
Finding and Replacing Text and Styles
The Find and Replace tool allows you to find and edit text and formatting easily.
Finding Text
To find text in your document:
#Go to Edit > Find and Replace OR use the keyboard shortcut (Ctrl + F).
#Type the text you want to search for into the Find Text textbox.
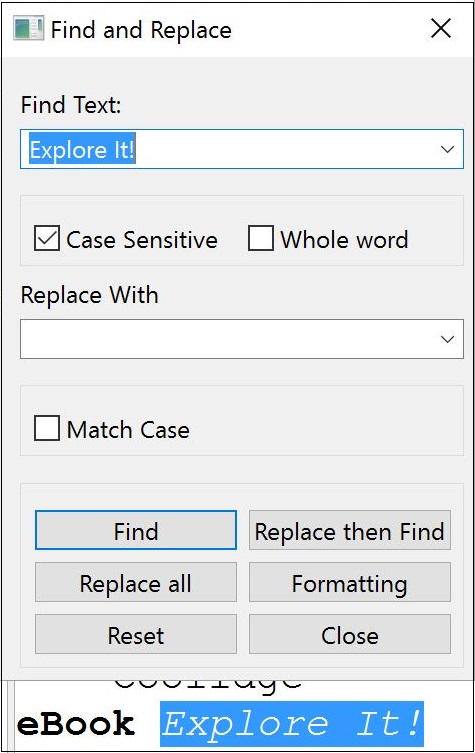
- (Optional step) Select one or both options to narrow down the search:
- Case sensitive: Only searches for the text as you type it in regard to capitalization.
Example: If you search for “THE” with Case sensitive checked, BrailleBlaster only finds instances of the fully capitalized characters “THE” and ignores any others, like “The” or “the.”
- Whole word: Only searches for instances of the text that are preceded and followed by a space, rather than instances of the characters within a longer word.
Example: If you search for “the” with Whole word checked, BrailleBlaster only finds instances of “the” where it stands alone as a word, and ignores results like “theater,” “them,” “bathe,” and so on.
- Select the Find button to search for an instance of the text. The text is highlighted in the Print View of your document for further instances of the text.
- (Optional step) Continue using the Find button to cycle through the document.
- Select Close when finished.
Replacing Text
To replace text in your document:
- Go to Edit > Find and Replace OR use the keyboard shortcut (Ctrl + F).
- Type the text you want to replace into the Find Text textbox.
- (Optional step) If appropriate, check the Case sensitive or Whole word checkboxes.
- Type the replacement text in the Replace with textbox.
- (Optional step) Check the Match case checkbox to maintain the capitalization of the original text.
Example: If you enter “even” in the Find Text box and “odd” in the Replace with box with Match case checked, “even” is replaced with “odd,” “Even” is replaced with “Odd,” and “EVEN” with “ODD.”
Note: Match case only works with lowercase, all uppercase, and initial case but not with camel-capped words or oddly capped words (e.g., BrailleBlaster or BrAiLLeBlASTer).
- Select the Find button to search for instances of the text.
- Select the Replace then Find button to replace that instance of text in the Find Text box.
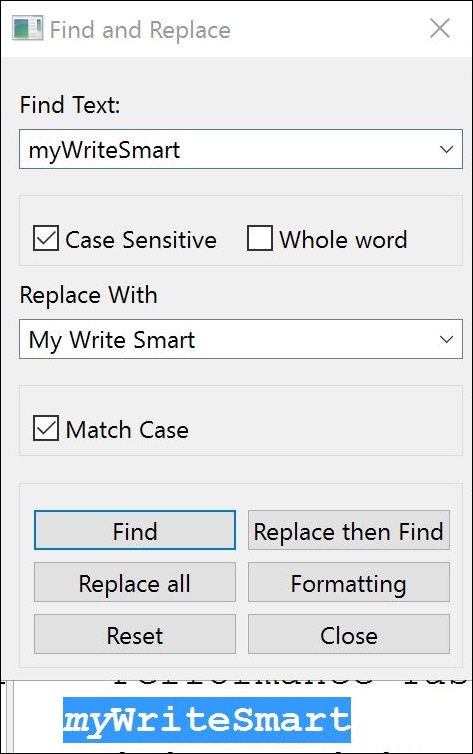
- The search moves automatically to the next instance of the word in the Find Text box. You can continue to use the Replace then Find button, OR you can select Replace All, changing ALL of the instances at once without clicking through each one.
- Select Close when you are finished.
Finding Formatted Text
In addition to changing text through the Find and Replace function, the formatting on text can also be located using the Formatting button in the Find and Replace window.
To find formatted text:
- Go to Edit > Find and Replace OR use the keyboard shortcut (Ctrl + F).
- Click Formatting to open the Formatting window.
- Styles and Containers: Focuses on Styles of text and margins.
- Text Attributes: Focuses on Emphasis and Translation of text.
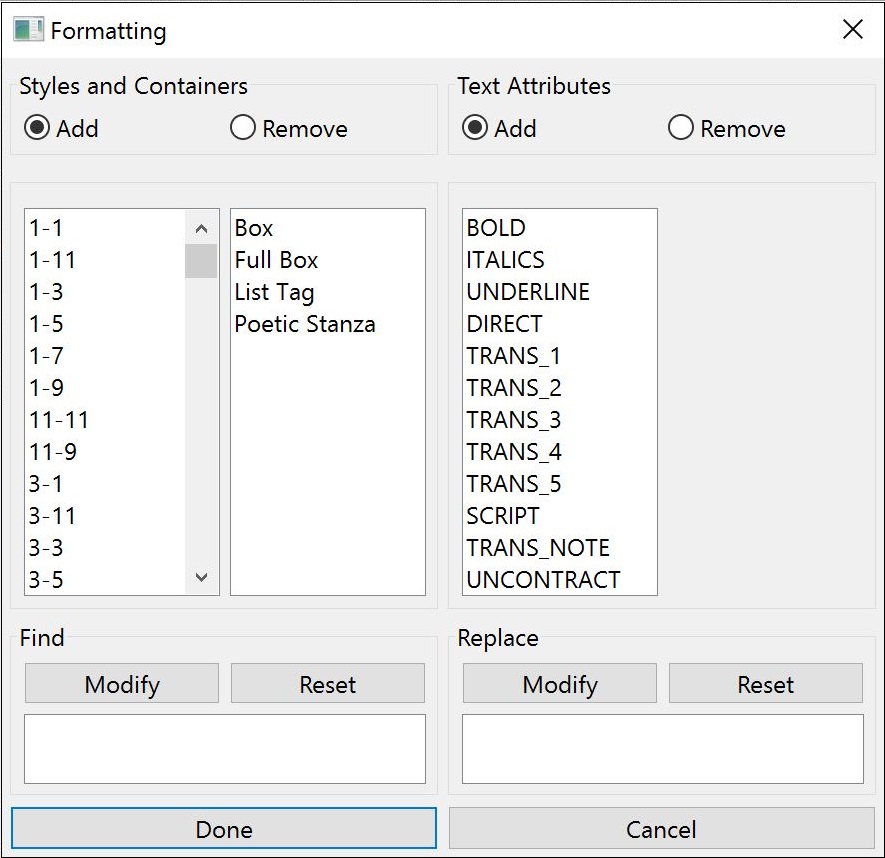
- Add: Only finds the text you typed if it has the selected formatting.
Example: If you add “Centered Heading” to the Find box, your search only finds the word “The” if it appears within a Centered Heading and ignores all other instances.
- Remove: The behavior of Remove is a little more complicated. It finds all instances of the text unless it has the selected formatting.
Example: If you remove “Centered Heading” to the Find box, it appears as “Not Centered Heading,” and search for all instances of “The” that are not within Centered Headings.
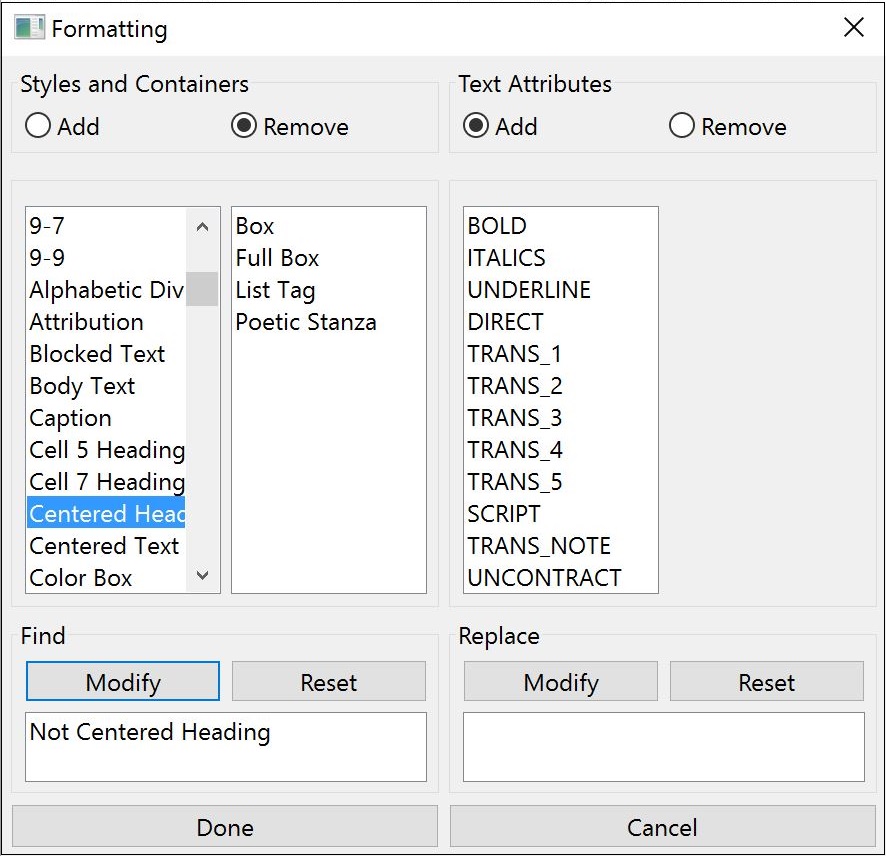
- Both Styles and Containers and Text Attributes have lists of options. Select whatever Formatting is appropriate.
- Select Modify to add Styles and Containers or Text Attributes to the Find box.
This action adds the selected item to the textbox under Find. If you decide you do not want an item included in your Formatting, select Reset to clear the Find box.
Note: Only one style can be added or removed at a time. Clicking a different style and then the Modify button only changes the style selected in the text box.
- Select Done to return to the Find and Replace window.
The Formatting you have selected now appears in a text box under Find Text.
- When finished, click Close to exit the Find and Replace window.
Replacing Formatted Text
To replace formatted text:
- Go to Edit > Find and Replace OR use the keyboard shortcut (Ctrl + F).
- Click Formatting to open the Formatting window.
The two options of formatting that can be changed are:
- Styles and Containers: Focuses on Styles of text and margins.
- Text Attributes: Focuses on Emphasis and Translation of text.
Both of these columns have Add and Remove radio buttons that function in the same way.
- Add: Adds the selected format to any instances of the specified text in the Find and Replace window.
Example: If you add “Centered Heading” to the Replace box, your search replaces the formatting of every instance of “The” to be within a Centered Heading.
- Remove: You cannot remove a style, but you can replace it. Trying to remove a style in the Replace box results in an error message telling you that the action is not possible.
- Below both Styles and Containers and Text Attributes have lists of options. Select whatever Formatting is appropriate.
- Select Modify to add the Styles and Containers or Text Attributes to the Replace box.
This action adds the selected item to the textbox under Replace. If you decide you do not want an item included in your Formatting, select Reset to clear the Replace box.
Note: Only one style can be added or removed at a time. Clicking a different style and then the Modify button simply replaces the style selected in the bottom text box.
- Select Done to return to the Find and Replace window.
The Formatting you have selected now appears in a text box under Replace with.
- When finished, click Close to exit the Find/Replace window.
Resetting Find and Replace
Click Reset to clear all selected formatting options and checkboxes. The most recently searched text remains in the Find Text and Replace with fields.
Repeating the Last Search
Repeat Last Search lets you repeat what you have searched for even after closing Find and Replace.
To repeat the last search, Go to Edit > Repeat Last Search OR use the keyboard shortcut (F3).
This action searches the document for the last searched item from Find and Replace and highlights it in the Print View. It does not open the Find and Replace window or make any changes.
Note: Continuing to use Repeat Last Search cycles you through the document. If your last search also included Replace information, your text is replaced when you move to the next item.
Operations Specific To NIMAS Files
Since BrailleBlaster is intended to work hand in hand with XML and NIMAS files, there are some tools in BrailleBlaster that are designed to work with this file type only.
Describing Images with the Image Describer
If your NIMAS file has images that are attached to the print, Image Describer can be used to make captions more easily. Using this tool lets you view the image within the program.
- Go to Tools > Image Describer.
Note: Alternatively, you can scroll through the document in the Style View to find an asterisk (*), and place your cursor on that style in the Print View. When you open the Image Describer that specific image in the text comes up in the window.
- From the Image Describer window, go to the Input Preference tab to either Six Key or Styled Text to type or six key descriptions in the textbox on the right-hand side of the window.
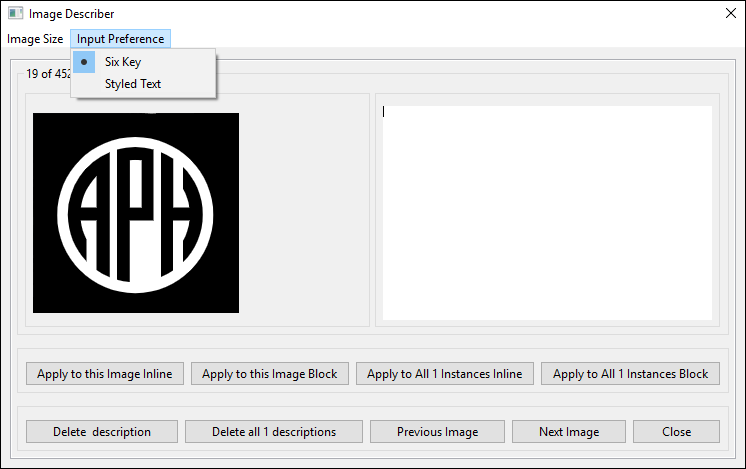
- (Optional step) Click the Next Image or Previous Image buttons to navigate from one image description to the next.
- Choose Apply to this Image Inline, if the text should appear on the same line, or Apply to this Image Block, if the text should appear on a new line as a caption.
For multiple instances of the image, choose Apply to All [X] Instances Inline to use the same description for them all. Choose Apply to All [X] Instances Block, for X instances to appear in the file, with X being the number of times.
Note: A warning appears in red text in the lower left corner of the window if a description for the image was included in the file. “Warning: This will replace the existing image description.” The NIMAS file already includes the description provided by the publisher, which you probably don’t want to delete. This warning only appears in the window if you are using the Input Preference of Styled Text.
- (Optional step) Select the Delete description button to delete the description that you have created. Select Delete all [X] descriptions if you have applied the description to multiple instances.
- Select Close when finished to exit the window.
Using Publisher’s Production Notes
The Production Note Manager is a tool that was designed to manage production notes. Production notes are added by the publisher and are meant to assist with the physical production of the textbook. There are many different kinds of production notes and some are useful in the braille transcription process, while others are not. The Production Note Manager lets you view these notes and decide which notes you would like to Keep, Hide, or Remove.
To keep, hide, or remove production notes:
- Go to Tools > Production Note Manager.
- A window opens listing the publisher’s notes. Choose one of three options:
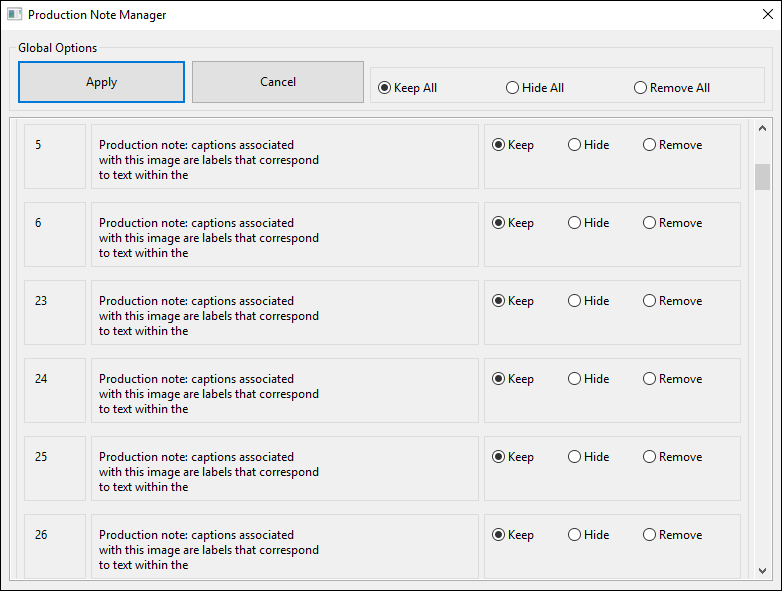
- Keep: While production notes are not usually found in the actual print book, there is a chance that the text has been improperly labeled or is a useful picture description. Select the Keep option to keep the production note in the braille.
- Hide: Selected as the default for all production notes, Hide removes them from the braille translation but keeps them in the file so they can be referenced in future versions that might not be meant for braille.
- Remove: Removes production notes entirely by deleting them from the file. This is not recommended as they are not recoverable after this action is taken.
Note: You can also choose options that affect all production notes, depending on what you need in your file: Keep All, Hide All, or Remove All.
- Click Apply to save your choice OR Cancel to leave the window.
Navigating A NIMAS File
The Book Tree allows navigation through NIMAS files via a list of nested headings. It shows the defined section levels listed in the NIMAS file.
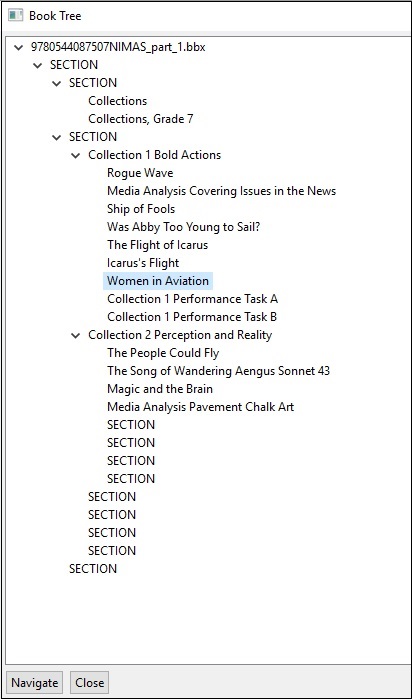
To navigate using the Book Tree:
- Go to Navigate > Book Tree.
- To display and navigate through ALL of the levels in ALL of the sections, select the right-facing arrow to the left of the file name.
- Select the section you want to navigate to and choose the Navigate button at the bottom of the window.
- Select Close to cancel the navigation action.
Dividing a NIMAS file into Multiple Files
You can save a single NIMAS file as separate files, so that different parts of the book can be transcribed by multiple people at the same time. Once the work is complete, the separate files can be merged back together into a single document. Currently only NIMAS XML files can be split in this way.
Splitting a Book (Split)
The Split option allows you to divide the source file into two or more separate files. Each part is saved as a separate BBX file with the original file name plus the part number (e.g., OriginalFileName_part_1.bbx).
Note: Do NOT rename the files AFTER splitting. Renaming the files makes it impossible to Merge them back together. Merging files requires that the names of the files remain the same as when they were split. If you want a different file name, rename the file BEFORE splitting.
To split a NIMAS file:
- Go to File > Split.
- Once selected, a Warning pops up asking for confirmation of the split. Select Yes to continue or No to exit.
This action opens the Split Book window. The book sections listed in the left-hand pane are automatically provided in the publisher’s file. Sections may be further subdivided, which is indicated by a right-pointing arrow in the left margin before the section’s name. Click on the arrow to expand the list of subsections.
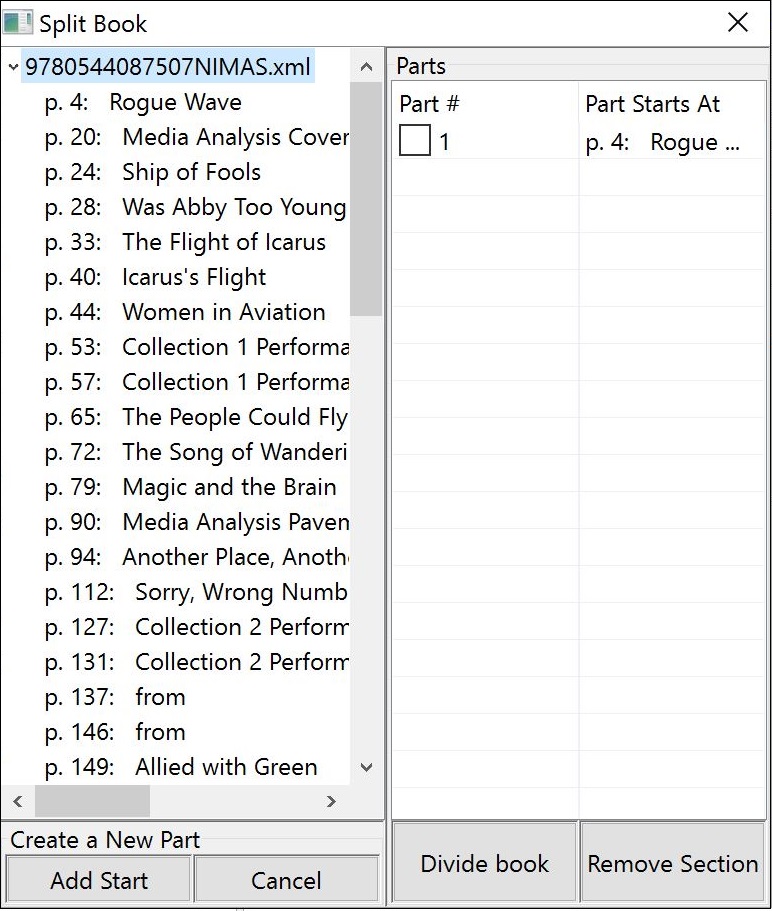
- In the Split Book menu, select a section from the left-hand pane.
- Click the button Add Start located at the bottom of the box. This action creates a part number with the selected section where it begins in the Parts list on the right-hand side of the window.
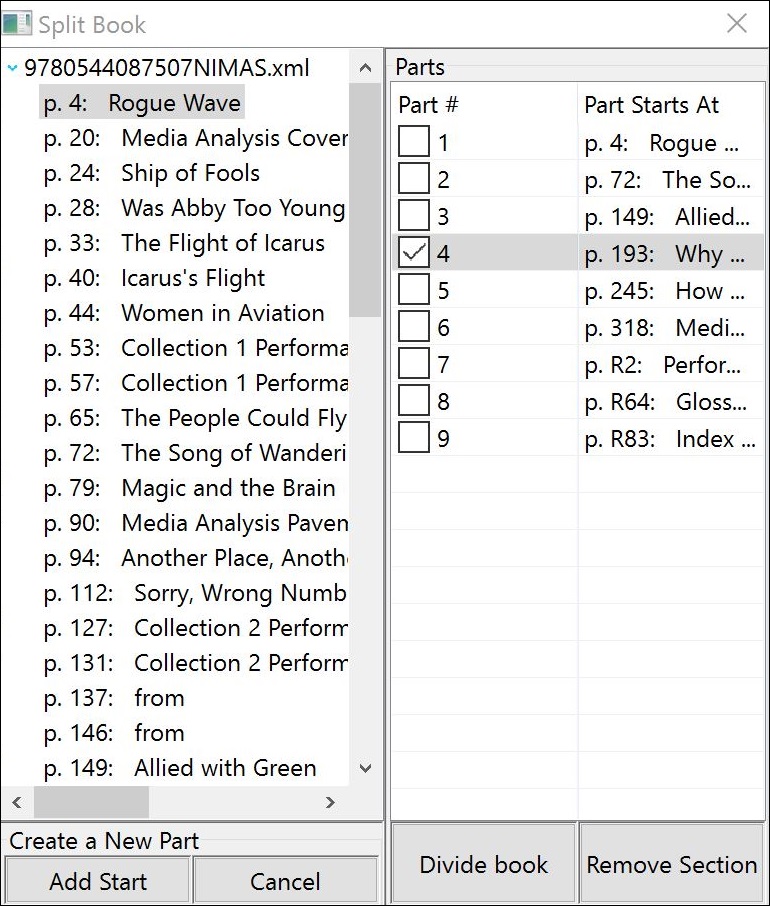
- Repeat as necessary, until the book is split into the total number of parts you want.
Once the desired number of parts are chosen and designated, the book is ready to be Split.
- Select the Divide Book button to complete the process.
Once Divide Book is clicked, BrailleBlaster takes a few moments to work as it processes the parts into separate files. When completed, a window opens asking if you would like to open one of the newly created files. Clicking Yes opens the folder where the split files were saved. A Manifest File (MNF) also appears in the folder, which is necessary for the Merge process.
Note: Do not change the file names or you won’t be able to Merge the files again.
Removing a Section
Setions can only be removed before the document is split. To remove a section from the Split Book process:
- In the Split Book menu, click on the check box of the part (or parts) to be deleted. You can check multiple parts if necessary.
- Click the Remove Section button. The selected sections are removed from the list of parts.
Note: If you remove a section from the beginning or middle of the list, the parts below are renumbered and moved up into that spot.
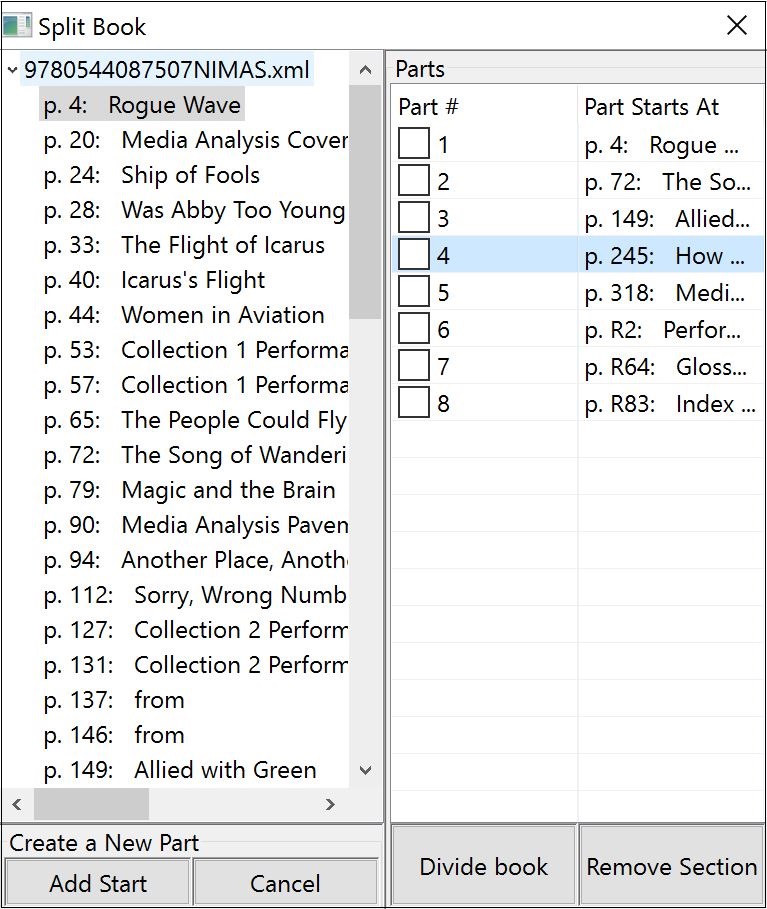
Merging a Book
Split files from the same original NIMAS file, and whose file names have not be changed, can be joined back together through the Merge function.
To merge a split book:
- Go to File > Merge.
- A prompt opens: “Load the master XML file generated by the Split Book process”. Click OK to continue.
- A file selection window opens, which defaults to where the original file is saved. Select the Manifest File (MNF) for the split parts to be merged.
Note: Because only files with the MNF file type can be opened using Merge, only these files are shown in the window. In order for the merge to work, all the BBX part files must also be present in this same folder with the same names from when the file was originally split.
- Click Open to start the Merge.
After BrailleBlaster processes the files, the new merged document opens in the main BrailleBlaster window. This file automatically has the same title as the original file but with the appendix “_merged” at the end of the file name.
Book Tree
Alphabetic Reference
Glossary
ASCII: Stands for the American Standard Code for Information Interchange but it is simplest to think of it as the print symbols that can be created by a keyboard.
Book Tree: The Book Tree is similar to a table of contents, showing the hierarchy of the book’s material. Although it does not show you the page numbers, selecting a section takes you to that page in the file. NIMAS files can be navigated using the Book Tree, which shows the Section tags and headings applied by the publisher.
Breadcrumb: The breadcrumbs feature shows different levels of styles applied to a piece of text. They are visible in the bottom section of the toolbar and show any containers and section tags. Clicking on one of the levels shown within the breadcrumbs highlights the section of text it applies to in the print view.
Note: When using a screen reader while breadcrumbs is active, any change to the breadcrumbs is read. You can turn breadcrumbs off by going to View > Toggle Views > Breadcrumbs.
Close (Ctrl + W): Closes the current document, but BrailleBlaster (and any other documents) remains open. Clicking the X in the tab above the print view where the file name appears (or New Document if you haven’t saved it with a new name yet) has the same result—closing only that document.
Container: BrailleBlaster automatically views some styles as being kept in a container, including List, Poetry, and Boxes. The word CONTAINER appears before the style name in the breadcrumbs, and when clicked, selects all of the elements with that particular style contained in the container. Once selected, you can select Unwrap Element from the tools menu to remove that style from the highlighted text, returning it to body text (3-1 margins). You can also search for particular containers in Find and Replace.
Element: Each section of text with a style applied to it is considered an element in BrailleBlaster. For example, every individual paragraph of Body Text or every individual line of a Poem is considered an element. You can navigate through each element, as described in Navigating Through Text Elements to review the formatting.
Exit (Alt + F4): Closes the BrailleBlaster application, including any open documents but giving an opportunity to save if changes have been made.
Loadouts: Loadouts allow you to create shortcut keys for styles. There are not enough shortcut key combinations available for every style in BrailleBlaster. As an alternative, you can configure the loadout to a particular style type and designate the style levels (as appropriate) to quickly change the formatting of your text, using shortcut keys rather than clicking with the mouse. See Configuring Style Loadouts for more information.
Set Cell Position: Sets the indentation position of the text at your chosen curser position. A dialog box opens in which you can type the cell number where the text at the cursor should start. If you type in a number lower than the cell the text is currently on, it moves to the next line and begins in that cell. It does not work if the cursor is at the end of a line.
Spell Check (F7): Reviews the print document for spelling errors. There are many options within Spell Check to make changes to the errors found:- Add to Dictionary: Adds the word to the dictionary so that it is no longer considered a spelling error in the current document and future documents.
- Ignore Word: Ignores the misspelled word and any other time it appears in the current document.
- Replace: Replaces the selected instance of the word with a suggested word from the list or with a word you type into the textbox.
- Replace All: Replaces all instances of the word within the document with a suggested word from the list or with a word you type into the textbox.
- Skip: Makes no change to the word and moves on to the next misspelled word. BrailleBlaster continues to recognize the word a spelling error, should you use Spell Check again.
Styles: Styles impact the margins of the braille and the use of blank lines in your document. BrailleBlaster uses many different “styles” to convey to the braille reader how the print is formatted. The default layout of BrailleBlaster shows the style view on the left, so that the name of the style is in line with the corresponding print to the right. The complete detailed list of styles are found in the Appendix A: Formatting Styles.
Note: An asterisk next to a style name in the Style view represents an image in that element. More details are in the Describing Images with the Image Describer section.
TOC Builder: The tool used to build the Table of Contents (TOC). Complete instructions on using this feature are available in Building the Table of Contents.
Toggle: Turns something on or off. For example, clicking View > Toggle Views > Breadcrumbs turns off the Breadcrumbs, removing them from the toolbar. Clicking View > Toggle Views > Breadcrumbs a second time turns them on, putting them back on the toolbar.
Help
Like any new software program, it is possible to run across some problems in BrailleBlaster from time to time. There are many tools in the program for reporting these errors as well as instructions on how to use the program more effectively.
Using the Help Menu
The Help menu in BrailleBlaster covers several areas. Some things you can use Help for include:
- Access a local copy of the BrailleBlaster User Guide OR use the keyboard shortcut (F1).
- Check for Updates, for the most up-to-date version of the program.
- Find which version of BrailleBlaster you are using, which is helpful for reporting errors to APH staff.
- Open the BrailleBlaster website to find additional information.
- Report errors with View Log or Reset BB.
Reporting BrailleBlaster Issues
Sometimes, BrailleBlaster has exceptions that appear when specific strings of actions are performed that the program cannot render, resulting in an error. If an exception occurs, the most effective way to solve it is to revert to your most recent save and try making the changes again.
One of the most important things to do if an exception happens is to report it with the Exception Reporting Service. Please help improve BrailleBlaster for other users by taking advantage of this feature. When an exception pop-up appears, send the exception to APH with the Tell APH About This Error So They Can Fix It button, or click OK to close the exception. We encourage you to report these exceptions rather than dismiss them so BrailleBlaster continues to improve.
View Log and Reset BB are both tools that can be found in the Help menu to report other potential BrailleBlaster errors. View Log provides the ability to view or save a software error log in the event that BrailleBlaster encounters an unexpected problem. This log can be provided to the technical support staff at APH to assist them in troubleshooting.
Reset BB is included with early releases because of potential conflicts that can occur when updating the program. If documents do not open after updating, but the previous version of BrailleBlaster worked fine, it is likely the cause of one of these conflicts.
CAUTION: The Reset BB feature deletes all user data, which includes changes to the translation, page settings, and font size. It is not recommended to use this feature unless first instructed to do so by an APH employee.
Appendix A: Formatting Styles
Style menu items are found both in the Styles menu and as buttons on the toolbar.
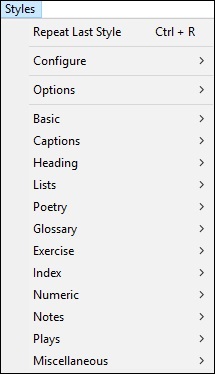

There are many Style options BrailleBlaster supports that are accessed from the buttons on the toolbar or from the Styles menu. Refer to Braille Formats, 2016 for further instruction on when to use each style.
Margins are presented as a hyphenated number with the indent listed first and the runover second. For example, a list item (which is in 1-3) has an indent of 1 and a runover of 3. In other words, the first symbol of the element with this style appears in cell 1, and if a second line is needed, that line and all subsequent lines begin in cell 3.
Basic Styles
These styles include some of the simple styles common to transcription.
Basic Styles Specification Table
| Style Name | Description | Margins | Blank Line |
|---|---|---|---|
| Blocked Text | Left justified paragraph | 1-1 | Before |
| Body Text | Indented paragraph (default) | 3-1 | None |
| Centered Text | Text centered on the page | Variable | None |
| Displayed 3-5 | Multiple displayed sentences following blocked text (1-1) or body text (3-1) | 3-5 | Before and After |
| Displayed Blocked Text | Displayed blocked paragraph following blocked text (1-1) | 3-3 | Before and After |
| Displayed Body Text | Displayed indented paragraph following body text (3-1) | 5-3 | Before and After |
Numeric Styles
Numeric styles apply the margins selected based the indentation of the first cell of text and the runover position used with no additional formatting. They are arranged in submenus based on the indentation, ranging from 1 to 11.
Numeric Styles Specification Table
| Style Name | Description | Margins | Blank Line |
|---|---|---|---|
| 1-1 | Text begins in cell 1 with runovers in cell 1 | 1-1 | None |
| 1-3 | Text begins in cell 1 with runovers in cell 3 | 1-3 | None |
| … | … | … | … |
| 11-9 | Text begins in cell 11 with runovers in cell 9 | 11-9 | None |
| 11-11 | Text begins in cell 11 with runovers in cell 11 | 11-11 | None |
Heading Styles
These styles follow the hierarchy of headings according to Braille Formats, 2016. For details on inserting a Running Head, see Setting a Running Head.
Heading Styles Specification Table
| Style Name | Description | Margins | Blank Line |
|---|---|---|---|
| Cell 5 Heading | Subheading (Second level) | 5-5 | Before |
| Cell 7 Heading | Subheading (Third level) | 7-7 | Before, unless immediately following a Cell 5 Heading |
| Centered Heading | Main heading (First level) | Variable | Before & After |
List Styles
List styles are arranged in submenus based on the number of levels within the list, ranging from 1 to 5. Each style begins with the letter L followed by the margins for each level within the list. BrailleBlaster automatically moves entries within a list to immediately follow one another, and includes a blank before the first list entry and after the last entry.
List Styles Specification Table
| Style Name | Description | Margins | Blank Line |
|---|---|---|---|
| L1-3 | List with 1 level | 1-3 | Before & After all 1 level list entries |
| L1-5 | First level in a list with 2 levels | 1-5 | Before & After all 2 level list entries |
| L3-5 | Second level in a list with 2 levels | 3-5 | Before & After all 2 level list entries |
| … | … | … | … |
| L7-11 | Fourth level in a list with 5 levels | 7-11 | Before & After all 5 level list entries |
| L9-11 | Fifth level in a list with 5 levels | 9-11 | Before & After all 5 level list entries |
Exercise Material Styles
Exercise styles are arranged in submenus based on the number of levels within the exercise, ranging from 1 to 5. Each style begins with the letter E followed by the margins for each level within the exercise. For example, an exercise that is only an open-ended question has one level, while a question with answer choices has two levels. See Braille Formats, 2016 Section 10 for more information.
Exercise Material Styles Specification Table
| Style Name | Description | Margins | Blank Line |
|---|---|---|---|
| Directions | First paragraph of unnumbered directions | 5-5 | None |
| Directions 7-5 | Second paragraph of unnumbered directions | 7-5 | None |
| E1-3 | Exercise with 1 level | 1-3 | None |
| E1-5 | First level in an exercise with 2 levels | 1-5 | None |
| E3-5 | Second level in an exercise with 2 levels | 3-5 | None |
| … | … | … | … |
| E7-11 | Fourth level in an exercise with 5 levels | 7-11 | None |
| E9-11 | Fifth level in an exercise with 5 levels | 9-11 | None |
Poetry Styles
Poetry styles are arranged in submenus based on the number of levels within the poem, ranging from 1 to 5. Each style begins with the letter P followed by the margins for each level within the poem. For information about line numbered poetry, see Line Numbering.
Numbered stanzas must be designated using cell 5 headings, as the Stanza style only inserts a blank line.
Poetry Styles Specification Table
| Style Name | Description | Margins | Blank Line |
|---|---|---|---|
| Stanza | Section of lines of poetry with print blanks between | Variable | Before |
| P1-3 | Poem with 1 level | 1-3 | None |
| P1-5 | First level in a poem with 2 levels | 1-5 | None |
| P3-5 | Second level in a poem with 2 levels | 3-5 | None |
| … | … | … | … |
| P7-11 | Fourth level in a poem with 5 levels | 7-11 | None |
| P9-11 | Fifth level in a poem with 5 levels | 9-11 | None |
Caption Styles
The style caption does not include transcriber’s notes indicators. These need to be added to captions, when appropriate.
Transcriber's Notes are automatically applied to all descriptions. For this reason, the entire item must be highlighted before applying style so that TN symbols are applied in the correct location.
Caption Styles Specification Table
| Style Name | Description | Margins | Blank Line |
|---|---|---|---|
| Caption | Print provided caption for illustrative materials | 7-5 | None |
| Description | Transcriber generated description for illustrative materials | 7-5 | None |
Glossary Styles
Glossary styles are arranged in submenus based on the number of levels within the glossary, ranging from 1 to 5. Each style begins with the letter G followed by the margins for each level within the glossary. Typically, the publisher has identified the term and the definition within the file, allowing the term to be used as a Guide Word automatically. See Working with Alphabetic References for more information.
Glossary Styles Specification Table
| Style Name | Description | Margins | Blank Line |
|---|---|---|---|
| G1-3 | Glossary with 1 level | 1-3 | None |
| G1-5 | First level in a glossary with 2 levels | 1-5 | None |
| G3-5 | Second level in a glossary with 2 levels | 3-5 | None |
| … | … | … | … |
| G7-11 | Fourth level in a glossary with 5 levels | 7-11 | None |
| G9-11 | Fifth level in a glossary with 5 levels | 9-11 | None |
Index Styles
Index styles are arranged in submenus based on the number of levels within the index, ranging from 1 to 5. Each style begins with the letter I followed by the margins for each level within the index. See Working with Alphabetic References for more information.
Index Styles Specification Table
| Style Name | Description | Margins | Blank Line |
|---|---|---|---|
| I1-3 | Index with 1 level | 1-3 | None |
| I1-5 | First level in an index with 2 levels | 1-5 | None |
| I3-5 | Second level in an index with 2 levels | 3-5 | None |
| … | … | … | … |
| I7-11 | Fourth level in an index with 5 levels | 7-11 | None |
| I9-11 | Fifth level in an index with 5 levels | 9-11 | None |
Note Styles
The styles for notes include those for footnotes (BF 2016 Section 16), but this style can also be used for endnotes and notes to a simple table, as they have the same margins. If a footnote has multiple paragraphs, the second paragraph needs to be formatted separately in 5-3. If the note is for a table which is presented in a listed, linear, or stairstep format, do not use the Footnote style (1-3) as these should have 7-5 margins. Designating text as a footnote only adjusts the margins; it does not insert the note separation line or move the text to the bottom of the print page.
To insert the Note Separation line:
- The Note Separation Line appears after the text element where your cursor is placed, meaning you must place your cursor at the end of the text previous to the footnote. If your cursor is at the beginning of the footnote, the Note Separation Line appears after the footnote.
- Go to Insert > Note Separation Line.
- The Note Separation Line appears as the ASCII in the print view.
Incidental notes, with and without a heading, can also be used for cross references as they have the same margins (BF 2016 Section 9.6).
Incidental Note without a Heading can also be used for footnotes to a listed, linear, or stairstep table, and for speaker’s notes in a slide presentation. If the Incidental note has a heading, it needs to be designated separately as a cell-7 heading.
Note Styles Specification Table
| Style Name | Description | Margins | Blank Line |
|---|---|---|---|
| Incidental Note with Heading | Incidental note or cross-reference with a heading | 5-5 | Before & After |
| Incidental Note without a Heading | Incidental note or cross-reference without a heading | 7-5 | Before & After |
| Footnote | Footnote that appears at the bottom of the print page, footnote to a table, or endnote | 1-3 | None |
Play Styles
Plays are formatted according to their type. There are two types of plays: Prose and Verse. A prose play is written in paragraph format, while Verse appears like poetry in print (BF 2016 Section 13).
Play Styles Specification Table
| Style Name | Description | Margins | Blank Line |
|---|---|---|---|
| Prose Play 1-3 | The first paragraph by a speaker in a prose play | 1-3 | None |
| Prose Play 5-3 | Additional paragraphs immediately following the first by the same speaker in a prose play | 5-3 | None |
| Stage Directions 7-7 | The first paragraph of stage directions in a prose or verse play | 7-7 | None |
| Stage Directions 9-7 | Additional paragraphs immediately following the first paragraph of stage directions in a prose or verse play | 7-9 | None |
| Verse Play 1-5 | The first line by a speaker in a verse play | 1-5 | None |
| Verse Play 3-5 | Additional lines immediately following the first by the same speaker in a verse play | 3-5 | None |
Miscellaneous Styles
This selection of style elements include those that do not fit into other categories.
Miscellaneous Styles Specification Table
| Style Name | Description | Margins | Blank Line |
|---|---|---|---|
| Alphabetic Division | The first alphabetic division in a glossary | Centered | Before |
| Attribution | Attribution following text with a runover of 1 | 5-5 | After |
| Source Citation | Source citation or permission to copy following an image | 7-5 | After |
| Guide Word | Selected words appear at the bottom of the page as guide words separated by a dash (Note: BrailleBlaster does not inform you if the selected guide words are too long, and cuts off braille characters to add the necessary blank space.) |
Centered | None |
| Page | Selected text appears as the print page number with a page change indicator (as needed) | None | |
| Transcriber’s Note | Each paragraph of selected text is enclosed in transcriber’s note indicators | 7-5 | None |
Boxes Options Specification Table
Within the Miscellaneous Styles are several options for Boxes.
| Style Name | Description | Blank Line |
|---|---|---|
| Box | Selected text appears within a top and bottom box line | Before the top box line & After the bottom box line |
| Color Box | Selected text appears within a top and bottom box line, and the color you type in the pop-up appears within transcriber’s notes on the top box line |
Before the top box line & After the bottom box line |
| Full Box | Selected text appears within a top and bottom full box line (the exterior borders for a set of nested boxes) |
Before the top box line & After the bottom box line |
| Full Color Box | Selected text appears within a top and bottom full box line (the exterior borders for a set of nested boxes), and the color you type in the pop up window appears within transcriber’s notes on the top full box line |
Before the top box line & After the bottom box line |
Appendix B: Shortcut Key Combinations
| Key Combination | Description |
|---|---|
| FILE OPERATIONS | |
| CTRL + N | Create a new document |
| CTRL + O | Open a document |
| CTRL + W | Close a document |
| ALT + F4 | Quit BrailleBlaster |
| CTRL + S | Save the document |
| CTRL+SHIFT+S | Save the document in a custom location |
| CTRL + P | Print a document |
| CTRL + E | Emboss a document |
| ALT + HOME | Open the Braille Preview |
| SHIFT + F10 | Open the context menu (same action as when you right click) |
| CTRL + + | Increase font size 1 point |
| CTRL + - | Decrease font size 1 point |
| EDITING | |
| CTRL + Z | Undo the last action |
| CTRL + Y | Redo the last action |
| CTRL + X | Cut the selected text |
| CTRL + C | Copy the selected text |
| CTRL + V | Paste copied text |
| CTRL + F | Open the find/replace pane |
| F3 | Repeat the last search |
| SHIFT + ENTER | Insert Line Break |
| CTRL + ENTER | Insert Page Break |
| CTRL + 5 | Convert text to Print Page Number |
| F7 | Spell check |
| CTRL + SPACE | Insert non-breaking space (represented as a white rectangle with a black outline in the print view) |
| CTRL + R | Repeat last style applied |
| CTRL + T | Correct Braille translation |
| F6 | Six-Key Input |
| CTRL + M | Math Translation Toggle |
| CTRL + D | Direct Translation |
| CTRL + SHIFT + T | Uncontracted Translation |
| CTRL + F2 | Wrap Prose |
| CTRL + SHIFT + F2 | Edit Line Number |
| NAVIGATION | |
| ALT + P | Toggle Print View |
| CTRL + G | Open the page selection options |
| CTRL + HOME | Go to the first page of the current document |
| CTRL + END | Go to the last page of the current document |
| ALT + END | Open the Book Tree |
| CTRL + Down | Go to the Next Element |
| CTRL + Up | Go to the Previous Element |
| Page Up | Next Page |
| Page Down | Previous Page |
| TYPEFORMS | |
| CTRL + B | Bold |
| CTRL + I | Italic |
| CTRL + U | Underline |
| ALT + SHIFT + S | Script |
| ALT + SHIFT + 1 | Transcriber-Defined Typeform 1 |
| ALT + SHIFT + 2 | Transcriber-Defined Typeform 2 |
| ALT + SHIFT + 3 | Transcriber-Defined Typeform 3 |
| ALT + SHIFT + 4 | Transcriber-Defined Typeform 4 |
| ALT + SHIFT + 5 | Transcriber-Defined Typeform 5 |
| CTRL + SHIFT + R | Remove Emphasis from Selection |
| LOADOUTS | |
| CTRL + SHIFT + M | Set Miscellaneous style loadout |
| CTRL + SHIFT + B | Set Basic style loadout |
| CTRL + SHIFT + C | Set Caption style loadout |
| CTRL + SHIFT + H | Set Heading style loadout |
| CTRL + SHIFT + L | Set Lists style loadout |
| CTRL + SHIFT + P | Set Poetry style loadout |
| CTRL + SHIFT + A | Set Plays style loadout |
| CTRL + SHIFT + G | Set Glossary style loadout |
| CTRL + SHIFT + E | Set Exercise Material style loadout |
| CTRL + SHIFT + I | Set Index style loadout |
| CTRL + SHIFT + U | Set Numeric style loadout |
| CTRL + SHIFT + N | Set Notes style loadout |
| ALT + NUMBER 1-8 | Apply the style level corresponding to that number for the current loadout |
| MISCELLANEOUS | |
| F1 | Open Braille Blaster User Guide |